Raft's Caravan Town is a ramshackle mess of old trailers connected by ladders and ziplines. You don't want to just run right in -- you're gonna have some tricky fights ahead. Our Raft Caravan Town walkthrough will help you get everything you need to snag the code for the next location in the game!
< Previous: Raft Balboa Island Walkthrough | Raft Caravan Town Walkthrough | Next: Raft Tangaroa Walkthrough >
Preparing for Caravan Town
Here's what I recommend you bring into Caravan Town at the minimum:
- Bow
- 60 Metal Arrows
- Hook
- Spear
- Food
- Water
- Flippers (Optional)
- Oxygen Bottle (Optional)
- Sweep Net

Approaching Caravan Town
First, you'll want to anchor your Raft near the docks. None of the caravans down here have anything particularly interesting, but there is a well with something in it. There's also a pipe that goes up. We'll get to that shortly.
Unfortunately, you'll likely be harassed by a White Screecher Bird before you know it.
Killing the White Screecher Bird
The White Screecher Bird will relentlessly pursue you and drop rocks on your head throughout your time on the island -- unless you kill it.
The White Screecher Bird (and other Screecher Bird types) will fly towards you and drop a rock on you. They largely stay airborne except when they're picking up a new rock -- and they often pick up a new rock out of your reach.
Retreat to the lower docks at water level (if you're not already there. When you see the White Screecher Bird flying towards you, aim and fire a single shot with your Basic Bow. Whether you hit it or not, run towards the White Screecher and keep going -- the rock should fall behind you. Repeat this process until this glorified chicken is dead.

While you're on the dock, look for a yellow building labeled "Port Office" -- you'll find the first Battery Charger Part here. Pick it up. Then, you can progress further in the island.
Climbing the Caravans
Start working your way up the trailers using ladders and stairs. Search the drawers and cabinets of every trailer; you'll find various junk and food within.You'll find a note in the yellow trailer with white stripes on the top and bottom -- Detto is talking about making the water go away somehow.
Keep working your way up. As you get close to the top, you'll hear a clucking sound. This is your opportunity to get a Clucker -- the game's equivalent of chickens.
The Second Battery Charger Part
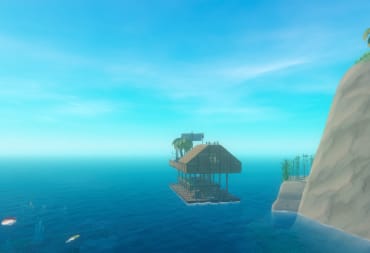
Keep heading up until you see this blue and white trailer with a blue ladder:

This trailer has the second Battery Charger Part on top. The building directly next to the Battery Charger Part will also have another note from Detto inside.
Twisted Trees Market
As you move up, you'll come across a bunch of trailers mixed in with some twisted trees. These trailers appear to have been some kind of market.
First, head into the Canned Goods store. You'll find a Note -- an article called "Sailing as One" about the raft towns of Indonesia. Look around the area and you'll see a green trailer and a yellow-green trailer at the top of a small mesa.

Climb the ladders to get up there and you'll find the third and final Battery Charger Part.
Come down off of the mesa. Throughly search all of the other trailers and take whatever loot you can.
The First Zipline Part
Next, go towards the trailer with the red top and blue bottom. Go behind it, look for a hand water pump, and drop down.
This is a puzzle that's all about redirecting pipes so the water shoots into each pipe, ultimately ending at a well down below.

Pump the water, follow it down, and realign the pipes until the water ends up in the well. You may have to run back up the cliff a few times as you readjust.
Once you have everything lined up correctly, you'll get your first Zipline Tool part. Climb back up to the market.
The Red Flag
Take a look at the area outside of the market and you'll see a building up a ramp with a Red Flag. Head towards it and go inside.

This is where you can ultimately craft the Zipline when you get the other two parts. Aside from the Zipline, you can find a note from Olof on the center table.
For now, you'll have to keep progressing. Go out the opposite side of the building and you'll find a ladder leading down. That ladder leads to a staircase, and that staircase leads to a bridge that is missing some planks.
The Broken Bridge
Make your way across the broken bridge by jumping over the gaps.

When you reach the other side, jump down onto the colorful staircase below you.
The buildings below you have various loot, but the key place we're headed is a bicycle connected to a red pipe going into the water.
Into the Deep
Next, we're going to go underwater -- deep underwater. But first, we'll have to deal with a Poison-Puffer. Make sure you're at full health before you dive in, because you have no chance of survival otherwise.
Follow the red tube into the water and you'll encounter a Poison-Puffer Fish. You definitely do not want to fight it in melee. Stay above the Poison-Puffer and fire your Bow. Four hits with Stone Arrows should kill it. Collect the loot from it and return to the surface.
Now, we're going to dive for real. We're making three stops along the way -- each of these buildings has an air pocket in them where you can recharge your oxygen:

Unfortunately (or perhaps fortunately), this area is littered with Poison-Puffers. You should expect to fight 5 or 6 on your way down to the ocean floor. Attack them one at a time from above by firing your Bow downward and keep your distance. If they explode, you'll probably die.
If you see a Poison-Puffer, do not immediately attempt to kill it. Return to your nearest Oxygen source (whether it's the surface or an underwater air pocket in one of the buildings), fill up your Oxygen meter, and then dive down. Kill the Poison-Puffer, return to your closest Oxygen source to recharge your meter again, and then progress downward.
The final destination at the end of the long red tube has three very useful items: the Infirmary Key, a Zipline Part, and the Metal Detector Blueprint.

Returning to the Surface... or Not
You may want to return to the surface to bring your loot back to your Raft, but there's an argument for hanging around this area. The Shark is nowhere to be found, Poison-Puffers are abundant, and there is a fair amount of Scrap, Metal, and other goods to get here.
Back to the Red Flag
Your next step is to return to the building with the red flag. Make sure you have at least one unit of Explosive Powder -- you'll need it for the next step. If you don't, return to your Raft to craft it; you can make Explosive Powder by putting Explosive Goo (which you get from killing Poison-Puffers and looting them) into a Smelter.
Once you're back at the building with the red flag, cross over the broken bridge again. This time, keep going forward instead of dropping down.
You'll see a strange red contraption ahead of you along with a note. This is apparently a rocket that was built by Detto after a previous attempt exploded and started a fire. Guess what? You're going to light this baby up.

Use the Explosive Powder and the rocket will launch into the air and explode spectacularly. A small piece of apparent debris will fall out and land on a tiny island in front of you.
Dive into the water below, then swim up to one of the sunken containers and climb up top. You'll find the doll Major Tom with the Zipline Part strapped to his back, completing the set. You'll also get the Blueprint for the Firework.
Return to the building with the red flag.
It's Zipline Time
Now that you're back at the building with the red flag, you can assemble all three of the Zipline Parts. Once you do, you'll get a Zipline Tool, the blueprint for the Zipline Tool, and the blueprint for the Zipline.
The Zipline Tool opens up access to two new areas: the Mayor's building and the Infirmary. Since we got the Infirmary Key earlier, let's head there first.

The Zipline Tool is a wearable item -- equip it on one of your body slots (at the bottom of your inventory. Then go up to the roof of the red flag building, face the Infirmary, and get ready to ride the Zipline.
Here, Piggy, Piggy
The Infirmary Island happens to have a small infestation problem. Four massive Pigs have gotten loose and they are very much hostile.
Equip your bow and snipe the Pigs from a distance. If you try to fight them in melee, they'll do a fair amount of damage. There's no need to risk it when it's totally avoidable.

You can also find a Bee Swarm in the area, so use your Sweep Net to catch it. There are Natural Beehives with Honeycomb, too.
The Infirmary
Once you've killed the Hogs and grabbed the Bee Jars and Honeycomb, it's time to head into the Infirmary.
Walk inside the Infirmary and turn left into a room with a white table. You'll find two Healing Salve in there, so take them. Then, head up the ladder in that same room. There's a trailer with a red door - use the Infirmary Key to open it up.
This locked room has a Good Healing Salve, the Mayor's Chest Key, and a note from Henrik, a man who was apparently the doctor. The note implies that Olof made the Pigs sick, and that in turn made the people sick.
Exit the room and take the rightmost ramp up. You'll find a Good Healing Salve and some Plastic in that room. Return to the trailer with the red door and head across the leftmost ramp; you'll find some more Plastic in there. Return back to the trailer with the red door once more, then head down the middle ramp to head back the way you came.
Work your way back to the Zipline. Take the downward-sloped Zipline back to the building with the red flag.
The Mayor's House
Go back up to the roof of the red flag building. Look around for the building with a massive "Mayor" sign on it and take a Zipline down.

Walk around to the other side of the building and you'll find a massive open area -- this is the Mayor's office.
First and foremost, go to the yellow workbench at the back left -- this is where you put the three Battery Charger Parts together and unlock the Battery Charger Blueprint.

Next, grab the Mayor Hat. There is no one else around, and therefore you are the Mayor by default. You've earned it. (Technically, you are also the Mayor of your Raft, I guess?)
Once you have your dapper new cap, open up the black Mayor's Chest at the back of the room with the key you got from the Infirmary. This gives you the final two pieces of the puzzle: the Blueprint for the Engine Controls and the Radio Code for Tangaroa, the next stop in your journey.
Before you leave this building, look on the upper ledge above the Mayor's desk -- you'll find a suitcase with some loot in it. Then, you can turn around and leave the Mayor's office.
Leaving Caravan Town
You now have the sixth and final Blueprint of Caravan Town and a fair amount of loot. It's time to move on to Tangaroa.
As always, you can take the opportunity to grab up loot, farm for resources, or capture animals before leaving. Caravan Town is a good source of Cluckers, so you may as well get a couple while you can. Whenever you're done, hop into your Raft and get moving to Tangaroa.
< Previous: Raft Balboa Island Walkthrough | Raft Caravan Town Walkthrough | Next: Raft Tangaroa Walkthrough >
Have a tip, or want to point out something we missed? Leave a Comment or e-mail us at tips@techraptor.net
One of my earliest memories is playing Super Mario Bros. on the Nintendo Entertainment System. I've had a controller in my hand since I was 4 and I… More about Robert N