Our Remnant 2 Starter Guide will teach you the basics of the game and walk you through the opening moments of the campaign.
Remnant 2 is a game with a surprising amount of replayability, owing in part to the randomization of worlds, monsters, and even the Map itself. There's a lot of treasure to find and tough bosses to fight, but first, you'll need to understand the basics of the game. Read on to learn more!
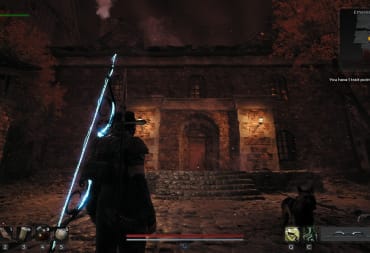
Remnant 2 HUD Explanation

- Minimap - This shows the immediate area around you along with the name of the area and icons for nearby loot.
- Objectives - If you have any active quests, the objectives will be shown here. (I have no active quest in this screenshot.) You can view the full quest text on the Map.
- Relic - This shows which Relic you have equipped and how many charges it has. Relics typically restore your health upon use.
- Consumables - This is where your consumable items will be shown if you have any. You can press the associated key to use one of them.
- Health Bar - This is your Health Bar. If it reaches 0, you die and respawn at your most recent Checkpoint.
- Stamina Bar - This is your Stamina Bar. Stamina is needed for running and dodging. If your Stamina is too low, you can't run or dodge. It does not drain when you are not in combat.
- Active Effects - Any active effects are shown here.
- Trait Power - This is the icon for your Trait Power and shows whether or not it is ready or on cooldown.
- Weapons - This shows your main weapon and your pistol. Your currently-equipped weapon is shown at the bottom. The equipped Mod for each weapon and the number of Mod Charges are also shown here.

Remnant 2 Starter Guide
Your adventure in Remnant 2 begins with creating a character. Choose your sex, appearance, and voice, and then we get can get started with our Remnant 2 Starter Guide.
Adventuring with Cass
Once your character has been created, you'll see a cutscene of you walking through a ruined city with a woman named Cass. You both attempt to make a jump, but your character fails and gets injured. At this point, you'll actually get control of the game.
Continue to hobble along the road. Eventually, you'll make it to the Fulton's Original sign where you'll have a short conversation with Cass. You'll regain full movement abilities once that conversation is over.
The first few areas are pretty straightforward; you and Cass are searching for a place called a "Ward." You'll climb up some ledges and open some doors. You will also find a "Blood Root," your first healing consumable.
Eventually, you'll go underground and face your first serious challenge.
Fighting The Root
Make your way through the warehouses and you'll reach an underground area covered in glowing red plants. This is evidence of The Root, a malevolent, plantlike enemy that has infested Earth and other realms.
Again, this underground area is pretty straightforward up until the big fight against The Root. You'll be assailed by several small enemies that don't seem to stop coming.
Whether you're successful or not, you'll eventually transition to a cutscene and get rescued by some people with strange powers. You'll have to run through the underground area for a bit, and then you'll have your first boss fight.

How to Defeat the Root Mantis
The Root Mantis represents your first real boss fight in Remnant 2. Fortunately, it's not too difficult and you have a lot of backup with you.
Focus on keeping your distance and using your rifle to do damage to the Root Mantis. Do not rely on the pillars for protection -- the Root Mantis can charge right through them and hit you anyway.
Here's an important tip for fighting the Root Mantis: make sure to dodge out of the way when it's charging in to attack you. That's your best bet for avoiding damage.
Killing the Root Mantis shouldn't be too difficult as long as you take care to dodge out of the way when it charges at you. Once it's defeated, you'll move on to Ward 13.
Entering Ward 13 and Meeting Founder Ford
You'll enter Ward 13 following the fight against the Root Mantis. You should spend the Trait Point you've earned from your victory.

You can reset Trait Points later, but it is not a cheap process -- it's best to be certain about what you'll spend it on. I recommend you spend your first point on Vigor; a little extra Health can never hurt!
Notice that you now have an objective on the top-right of the screen. Press M to bring up your Map and see it in full.

Head deeper into Ward 13 and you'll see an exclamation point icon pop up. This leads you to Founder Ford.
Go into the main warehouse and speak with Ford. This is an opportunity to learn some lore about the world of Remnant 2 if you wish. If you want to hop right into the action, end the conversation as quickly as possible.
Either way, Ford will ask you to escort him on a mission. But first, you'll have to visit Wallace.
Visiting Wallace and Choosing Your Archetype
Your next objective is to visit Wallace down by the docks. When you speak with him, he'll tell you that you need to pick an Archetype.
Archetypes are Remnant 2's version of classes. Each Archetype has its own unique Trait, unique Archetype powers, and unique starting equipment.
Here are the Archetypes you can select from:
- Medic - Focuses on healing and support. Starts with a machine gun.
- Hunter - Focuses on long-range damage. Starts with a sniper rifle.
- Challenger - Focuses on tanking and close-range combat. Starts with a shotgun.
- Handler - Focuses on teamwork. Starts with an assault rifle and a dog companion.
- Gunslinger - Focuses on raw damage output. Starts with a rifle.
Take care in making your choice; you're going to be stuck with whatever you pick for quite some time. Choosing an Archetype will automatically equip you with that Archetype's unique Trait and its unique Armor Set.
Getting Your Guns from Brabus
Your next stop will be Brabus, the weapons merchant of Ward 13. Simply speak to him and he will automatically issue your Long Gun (main weapon), Hand Gun (secondary weapon), and melee weapon depending on what Archetype you chose.
Test out your new guns on the firing range. If you don't like them, don't worry -- you can always buy any of the other guns from Brabus once you've earned some Scrap.
Ava and Rigs Upgrade Your Equipment
Your next step is back in the warehouse where you met Founder Ford. This time, you'll stay on the ground floor and talk to two NPCs, starting with Ava McCabe.
Ava McCabe can convert rare materials acquire from bosses into Mods for your Weapon. The first one is free and will consume the Root Ganglia you got from killing the Root Mantis. You have four choices:
- Healing Shot - Launches a payload that explodes on contact with allies, healing a portion of their max health.
- Concussive Shot - Fires a focused blast of air that damages enemies in a radius in front of you.
- Scrap Shot - Fires a grenade that explodes into caltrops on the ground, slowing any enemies that walk over them.
- Hot Shot - Increases ranged damage and imbues your ammo with Fire. Shots apply Burning damage to enemies.
Select whichever you think would work best for your playstyle. As with the guns, you can acquire the other ones later once you've earned some Scrap.
Next, talk to Rigs by the nearby forge. Rigs can upgrade any one of your weapons once for free. I strongly suggest that you upgrade your new Long Gun that you got with your Archetype since that is your best damage potential.
There are plenty of other people to talk to in town, but you can't really buy anything from them just yet. It's best to head to your objective and get moving with Ford.
Returning to Ford
Ford will lead you to an underground research facility in "The Old Ward." Ford will tell you about the history of the World Stones.
You'll then encounter a locked door. Ford will run upstairs looking for the key. You can find a matchbook and a "Dragon Heart" Relic behind the painting.
The Dragon Heart is an item that will allow you to heal. It only has 3 charges when it's full, so use it carefully.
Walk back over to the locked green door. Ford will tell you to look at the matchbook. Go into your inventory and inspect the matchbook, then open it to reveal the Ward 13 Key. Exit your inventory and interact with the door again, then use the key to open the door.
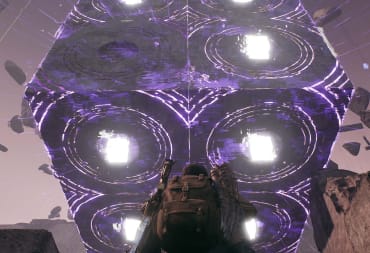
The Red Crystal
On the other side of the door, Ford will talk about the World Stone. Surprisingly, he will then activate the World Stone and disappear after touching it.
Clementine -- the woman who saved you from The Root earlier with her powers -- will run into the room. You will then hear a voice talking about needing something and Clementine will be pulled into the World Stone.
Having seen two people disappear, your character will make the brave decision to touch the World Stone and find out what's on the other side. It's time to explore some strange new worlds.
Exploring Worlds and Using the World Stone
On the other side of the World Stone, you'll be standing in front of an identical crystal on an alien world. Interact with it and it will reveal which of three worlds you've traveled to.

The possible worlds are:
- Yaesha (Corruptor or Ravager)
- N'Erud (Tal'Ratha or The Guardian)
- Losomn (Faelin or Faerin)
The world you go to is entirely random; you cannot choose.
Click on the name of the world to bring up the map for that world.

This, too, is randomized somewhat; your Yaesha will not necessarily look like my Yaesha, and so on. Each of the small circles on the map represents different zones within that world.
As with many of the other options in this game, you won't miss out on the other two worlds; you'll get to visit them later after completing the first and second worlds.
The World Stone allows you to save your game and fast travel. It also fully heals you and restores your ammo. If you die, you will respawn at the last World Stone you interacted with.
However, using the World Stone will also revive all enemies. You have to travel from World Stone to World Stone to progress further into a world and eventually fight its boss.
Now Your Adventure Really Begins
You now have a whole world to explore. There are new Traits to discover, lots of loot to find, and a mystery to solve -- what happened to Ford and Clementine?
You'll discover all of that in more as you explore more of the game, but for now, that's the end of our Remnant 2 Starter Guide. Make sure to check out our other guides below!

Where is the Remnant 2 Save File?
The Remnant 2 save file is located under C:\Users\YourUserName\Saved Games\Remnant 2
Remnant 2 Save Scumming Tip: Before a boss, copy this elsewhere, and if you want to make another choice - just copy it back and replace the existing.
Remnant 2 Corrupted Save Tip: If for some reason, you're having issues with your save - delete sav_0.sav and update sav_0.bak one to sav_0.sav. You'll lose a bit of progress, but your game will be intact.
What Happens When You Die in Remnant 2?
If you die in Remnant 2, you will return to the last checkpoint. All of your ammo and Relic charges will be refilled and all of the enemies will respawn. If you are playing Hardcore mode, however, you will be permanently dead.
That's the end of our Remnant 2 Starter Guide. Check out our other guides below!
Have a tip, or want to point out something we missed? Leave a Comment or e-mail us at tips@techraptor.net
One of my earliest memories is playing Super Mario Bros. on the Nintendo Entertainment System. I've had a controller in my hand since I was 4 and I… More about Robert N