Techtonica is a game all about automation, much like Factorio was before it. It can be a bit tough figuring out how to get started with automation, so our Techtonica automation guide is here to teach you how to automate your factory from your first machines beyond.
If you enjoy this guide, you should consider checking out some of our other content on the game, such as our Techtonica starter guide, or you might want to look into our articles on other crafting games like Forever Skies.
Techtonica Automation Guide
Getting started with automation in Techtonica relies on you being familiar with inserters, conveyor belts, and the other basic building blocks of automation. We’ve set out these basics for you below.
How to Use Inserters in Techtonica

Inserters are important devices in Techtonica, they’re required to transfer objects from your various machines to containers or other machines in your factory. They have a very specific set of rules they follow, though these rules can change with later technological upgrades.
First, you must make sure you pay attention to the direction arrows when placing your inserters. They only pass objects in one direction at a time. You must also make sure that the inserter is one block away from both the place it is taking objects and the place it is inserting them.

Be aware that you can only pick up objects from covey belts, or out of/into the ports on machines pictures above. If you try to grab objects from just any part of the machine, it won’t work.
How to Use Conveyors

Conveys are the second most important part of your operation, as they’ll be responsible for actually moving your bits and pieces around your factory. They can be set up in big trails, and only move in one direction.
You can also set up multiple input/output crossroads by building tracks into each other. These crossroads are best used to funnel several machines into a single processing or storage unit.
You can also have multiple exits from a conveyor crossroad, but it will alternate between each exit path with every object that passes through.
Your First Automated Factory
When you first load into Techtonica, you’ll be given tasks in order as you unlock new tech and make discoveries. However, these tasks rarely explain how you’re supposed to use any of the tech you unlock. This section will walk you through building your first working factory and beyond.
Drilling and Smelting
At the start of the game, you’ll be tasked with building the basic building blocks yourself. Follow the task list until you unlock the basics of automation, which are inserters and conveyors in the logistics tab of the crafting menu.
Go and make a lot of conveyors and inserters. Even for the basics you’ll need around 20-30 inserters and a good 50-60 conveyors at minimum. Also make a handful of smelters and containers, not forgetting to use any you already have access to.

Start with your machines and containers first. You’ll want a container for fuel and one for your finished product, and it’s good practice to keep things compact is to keep them close to your smelter so you can use inserters on their own to handle moving fuel in and goods out.

Plot out paths from your fuel container to both of your drills, leaving a single space for your inserters to be added at the end to get everything started.
Now plot out paths from your drills back to your smelter and add every inserter you need except for the one from your fuel container into the network. You can use this method to keep everything paused while you check conveyors and inserters are facing the right direction.

Place the final inserter once you’ve filled your fuel box with something and watch the magic happen. Remember, with the slowest inserters, your machines may occasionally flicker the “no fuel” warning while the inserter gives it more.
Just dump your bundles of plant matter into the fuel box and over time ingots will come into your storage box. Set up another version of this factory on the other side of your starting base to harvest both iron and copper.
How to Craft Stuff with an Assembler
Once you’ve got a factory that can practically infinitely produce Iron and Copper, you’ll want to start producing different resources automatically. To do this, follow the instructions in the main task list until you reach the second base area, where you will find some derelict assemblers to scan.
Unlock the assembler in your Tech Tree for 8 research orbs, and you need to grab the crank generator and basic construction from the energy tab too.

Your first product should almost certainly be bio-bricks, as they’re a much more efficient fuel source than simple plant matter. Construct a flat power floor with a decent amount of space for machines, since this will also be what sends power from your generators to your machines.
Place down two containers next to your first assembler, with one having two ports facing the assembler and the other with one. Fill the container with two ports with limestone, and the other with plant matter, since bio fuel requires twice as much limestone as plant matter.

On the other side of the assembler fit another container to catch your finished products, and also some crank generators to power the assembler. Inspect the assembler and in the UI select a recipe on the left. Now as long as you supply it with power, the assembler will churn out bio bricks for you.
This setup does require you to return every five minutes to crank your generators, but you can automate that later as well. Just make sure you keep dumping your junk into the two containers every few hours.
Advanced Automation in Techtonica
Using the basic blocks we’ve described so far you can construct a huge number of different products from the starting resources of Iron, Copper, and Plant Matter. However, there are a few more advanced machines and upgrades that you’ll get access to later on to aid you in your 100% automation journey.
Treshers and Planters
Threshers and planters are more advanced machines you gain access to after you’ve done some exploring. You’ll find them both in a nearby warehouse ready to be scanned and unlocked during the course of the main questline.
Once unlocked, you can use Planters to plant seeds from the flowers you’ve spent time harvesting. Then you use threshers to process the plants into their basic components to turn into fuel.
How to Make Sustainable Fuel

Set up a container for your seeds, with a planter connected to it by a basic inserter. Make sure you build on powered floor as your planter required energy to work.
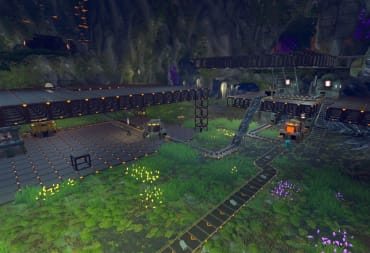
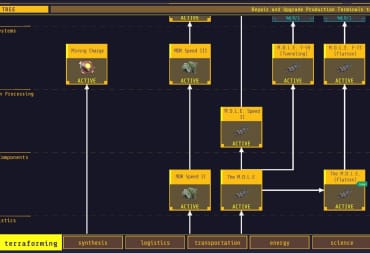
Next, build a thresher connected to the planter with another inserter. Set up two filters on the other side to collect the output. One output should be set with your plant’s seeds, and the other with the bundle of dry plant matter you should see in the output of the thresher.

Set up some conveyers, one to take the seeds back to the seed container, and another to feed into another thresher. The picture above should be a good guide if you’re struggling to get the pattern down.

Finally, set up a container on the other side of your final thresher to collect both your Plantmatter FIber and plant extracts. At this stage, you can also elect to use another filter inserter to feed your fiber into an assembler to turn it back into plant matter for your bio brick assembler.
How to Get Infinite Energy
So far this automation has been dependent on cranking your generators to produce energy. As long as you’ve been following the main questline properly then you’ll eventually unlock a way to make self-turning generators using Water Wheels.

Once you’ve found and unlocked Water Wheels on the tech tree, you’ll need to place them in water, but near enough to some powered floor that you can also place a crank generator close by.

Look out for the bar that appears to connect the water wheel and the generator in the building menu. Once placed, your generator will keep generating power continuously without you needing to do anything.
You can quickly build a huge network of these wheels to power your automatic factory.
That's it for this Techtonica guide, you can check out even more of them below.
Have a tip, or want to point out something we missed? Leave a Comment or e-mail us at tips@techraptor.net

Will has been writing about video games professionally since 2016 and has covered everything from AAA game reviews to industry events and everything in… More about William