In this Techtonica Atlantum Processing Walkthrough, we'll explore how to make infinite Biobricks and unlock Tier 6 of Tech.
Techtonica's complexity increases as time goes on and we've reached the most difficult part yet. Surprise, surprise -- we're going to make even more factories. Read on to learn more!
Techtonica Atlantum Processing Walkthrough
A central focus of this Techtonica Atlantum Processing Walkthrough is going to be on improving our old factories. We have more resources and more Research unlocked, so we'll be able to make them much nicer.
< Cooling Systems | Atlantum Processing
First, let's get a handle on unlocking the next Tier. It requires the following:
- 450 Atlantum Ore
- 900 Iron Ingots
- 900 Copper Ingots
- 900 Processor Units
We already can make Iron Ingots and Copper Ingots. We can't yet manufacture Processor Units in quantity, and we haven't even seen Atlantum Ore.
Manufacturing Processor Units
Let's work with what we can do for now: manufacturing Processor Units. Craft 2 Assemblers, 2 Containers, and 6 Inserters. Then, place 2 Assemblers and 1 Container as shown in the below image.

Next, go to the opposite side of the Assemblers and place another Container.
Put one Inserter from each Assembler onto a Conveyor Belt and into the last Container. This way, each Assembler separately feeds into the same Conveyor.

Now, go back to the other side of the Assemblers. Set both Assemblers to produce Processor Units.
Place an Inserter/Conveyor/Inserter lines going from each Container into each Assembler. These lines will cross over each other as shown below.

As you can see, we're already getting Plantmatter Frames fed into each Assembler.
Now, all we need to do is feed Electrical Components into the Assemblers. Place Electrical Components into the other Container.

It takes a fair amount of time to produce Processor Units; that's why we decided to place 2 Assemblers.
Now, we have one more thing to decide on: the Container feeding Electrical Components.

If we want, we can set up Assemblers behind this to make Electrical Components. That would involve making long Conveyor Belts from the Copper Ingot and Iron Ingot manufacturing area and setting up several more Assemblers.
Unfortunately, at this point, I've encountered a bit of a problem:

Our Mining Drills are getting Plantmatter just fine. Our Smelters, however, are running short.
This is because of our use of Inserters to divide the flow of goods coming out of the source chests.

More importantly, we're going to have another issue: we're not making the most of our Iron and Copper Veins.
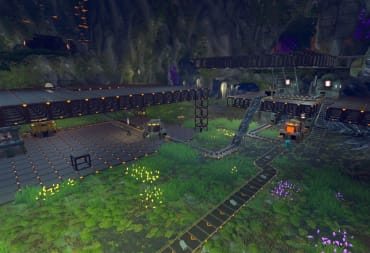
Take a look at our old Iron Ore Mining Drill setup:

It's served us well, but we could do with some expansion here.
Expanding the Iron and Copper Factory
We're going to expand our Mining Drill and Smelter setup significantly. The easiest way to do this will be to delete everything near Production Terminal Lima, so let's get moving.
Start by cutting off the incoming supply of Plantmatter:

We can reconnect this later once we've redesigned the Mining Drill and Smelter setup.
Next, let's build several Containers over by the wall opposite of Production Terminal Lima.

These Containers will be used to store all of our materials and supplies from the old construction.
Now, we're going to delete absolutely everything around Production Terminal Lima. All of it has to go.

While this is going on, start Crafting Research Core 380nm (Purple). We're going to want at least 200 of them.
Head over to the river near Production Terminal Lima and flatten the area around it.

Next, we're going to extend our Power Floor over toward the river, but just barely.
Build a stack of Power Floors up to the level of Production Terminal Lima and start moving it toward the river.

This will let us send Power in either direction from the river to where our Core Composer and production is set up.
Continue Building the Power Floor over to the other side of the cave and bring it back down to the level of the river.

We'll get back to this later.
Next, let's set up 4 Mining Drills on Iron. Put a Conveyor Belt going toward them for Fuel. Split the one incoming Conveyor Belt line into two. Then, split each of those incoming Conveyor Belt Lines into two.

This will allow us to send in one line of Fuel and have it split evenly between the four Mining Drills, all but removing any issues from uneven distribution.
Next, we're going to repeat the process for outgoing Conveyor Belts. Merge four outgoing Conveyor Belt lines into two, and then merge those two outgoing Conveyor Belt lines into one.

This will let all of the Iron Ore move from four distinct Conveyor Belts and into one Conveyor Belt.
We're going to do the exact same setup over at the Copper Ore deposits on the other side of the river: 1 incoming Conveyor Belt split into 4 and 4 outgoing Conveyor Belts merged into 1.

With this done, it's time to set up 4 Smelters for Copper.
As with the Mining Drills, we'll need a similar setup as with the Mining Drills. This time, though, we'll have both Conveyor Belt lines feeding into each Smelter -- one for Fuel and one for raw Ore.

Naturally, we'll need somewhere for the finished Ingots to come out.
Put a straight Conveyor Belt on the other side of the Smelters leading to a Container.

Now that we need to do a similar setup for Copper Ingots.
Before you set up the Smelters for the Copper, make sure to deposit 200 Research Core 380nm (Purple) into the Core Composer.
Then, we need to connect up all of the Conveyor Belt lines. Fuel should go into the Mining Drills and Smelters, Ore should go into the Smelters, and the finished Ingots should go into their respective Containers.
Here's what the whole setup looks like:

Even with the Plantmatter Farm running at full speed, we don't get enough Fuel for all of these machines to run at 100% all of the time. We have the capacity to improve upon it later by adding another Plantmatter Farm or manufacturing more advanced Fuel.
For now, though, we have the Fuel problem handled.
Improving the Power Problem
Now it's time to handle the Power problem. Open up the Tech Tree and unlock the following:
- Energy / Cooling Systems / Water Wheel
Head back over to the river where we placed the step-down of the Power Floor. Flatten a larger area around the river.

We're going to place at least 12 Water Wheels to get started, so get to Crafting.
Place the Water Wheels along the river, one space apart from each other.

Now we need to connect these Water Wheels to our Power Network.
Build Power Floors in line, 3 spaces wide, from the Water Wheels onto the shore.

Next, connect all of these lines of floor together.
Build one Crank Generator immediately next to each Water Wheel. You'll see a pipe connecting the Crank Generators to the Water Wheels, just like the ones by the Core Composer.

These will provide endless Power as long as they are connected to the same Power Floor as the one by our Core Composer.
Speaking of the Core Composer, go over there and remove the 12 Crank Generators. Line them up in parallel with your Water Wheels.

This effectively doubles our Power production and automates it, to boot. This also finally makes our Fuel production infinite and, as a consequence, our Copper Ingot and Iron Ingot production.
Now it's time to automate the production of those Processor Units we need so badly. We're also going to upgrade our Fuel situation, too.
As before, we should use this time to make some Research Cores. Start Crafting 445 Research Cores immediately. If you have to pause operations, that's fine -- but make sure to keep Crafting Research Core 380nm (Purple) in the background.
Renovating the Plantmatter Farm
First, let's go back to our Plantmatter Farm and our old Assembler setup.

We're going to need to start by deleting everything on the right-hand side of the screen. This will remove our ability to make Processor Units automatically, but we'll improve the situation soon.
Next, we're going to remove our entire Plantmatter production operation so we can redesign it. Bear in mind, we're going to need
Since you should have a good grasp of the basic principles by now, we're not going to go step-by-step for each part. Instead, I'm going to show you the finished product, and then I'll break it down.

First, we've basically rebuilt the Plantmatter farm, but we've added four Smelters at the end.
Smelters can turn Kindlevine into Limestone when they're Fueled.

The Plantmatter farm feeds Plantmatter into these two new Assemblers at the end.
The Smelters feed Limestone into these two new Assemblers as well.

Finally, these two new Assemblers are producing Biobricks.
The Biobricks loop around behind the Smelters to fill up short Conveyor Belts.

Once those Conveyor Belts behind the Smelters are full, the Biobricks will keep moving back on the old Conveyor Belt line where we fed Plantmatter into our Iron and Copper manufacturing.
That means all of our Iron and Copper manufacturing are now powered by Biobrick.

Here's the new process:
- Kindlevines are grown in 2 Planters.
- Kindlevines are moved into the first pair of Threshers.
- Thresher 1 splits the Kindlevine into Sticks and Kindlevine Seeds.
- The Kindlevine Seeds from the first pair of Threshers are returned to the Planters.
- The Sticks are sent to a second pair of Threshers.
- The second pair of Threshers split Sticks into Kindlevine Extract and Plantmatter Fiber.
- The Kindlevine Extract is sent to a Container as a buffer.
- The Plantmatter Fiber is sent to the first pair of Assemblers.
- The Kindlevine Extract Container is emptied into Smelters.
- The first pair of Assemblers turns Plantmatter Fiber into Plantmatter.
- The Smelters turn Kindlevine Extract into Limestone
- The Plantmatter from the first pair of Assemblers is sent to the second pair of Assemblers.
- The Limestone from the Smelters is sent into the second pair of Assemblers.
- The second pair of Assemblers makes Biobricks from Plantmatter and Limestone.
- The Biobricks from the second pair of Assemblers loop behind the Smelters, providing them Fuel.
- Any additional Biobricks continue on toward the Iron and Copper production area.
In short, you can turn a handful of Kindlevine Seeds and some Power (provided by Water Wheels) into an infinite source of Fuel, which can then infinitely produce Iron and Copper.
You don't have to follow my example; you may be able to engineer something better, or you may wish to keep things simpler. But I can say that this setup works well enough for keeping everything Fueled up. If you think this isn't enough Biobrick production, you can simply replicate this setup and double your output.
Producing Processor Units
Now that we have our source of Fuel, it's time to finally get to producing those Processor Units. We've already done this setup before, but now we have more Fuel and steady Power.
As a reminder, here's what our Processer Unit manufacturing looks like:

Here's how it works:
- The Assembler on the right takes leftover Plantmatter Fiber from the Biobrick farm and turns it into Plantmatter Frames.
- The Plantmatter Frames are deposited into a Container.
- Electrical Components are deposited into a Container by hand.
- The Plantmatter Frames and Electrical Components are placed into two Assemblers.
- The two Assemblers produce Processor Units.
You'll have to pipe in a Conveyor from your second group of Threshers to feed Plantmatter Fiber into the first Assembler. You may need to remove some of the Inserters to allow some of the Plantmatter Fiber to go through. Essentially, you're trading Fuel production for Processor Unit production.
Nearly everything about this process is automated, but we can make it 100% automated now. Go back over to the Iron and Copper production area. We're going to set up some Assemblers.

Compared to some of our previous works, this is pretty straightforward. Copper goes into the first Assembler to make Copper WIre. The Copper Wire is stored in a Container as a buffer.
The Copper Wire is then withdrawn from the buffer Container and put into a second Assembler with Iron Ingots. This make Electrical Components automatically, which we can then feed into the Container by our Processor Unit manufacturing.

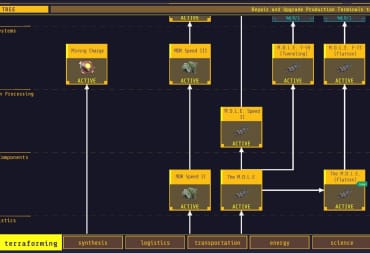
Speaking of Processor Units, it's time to make use of some of them. Grab at least 40 Processor Units and head to Production Terminal Victor.
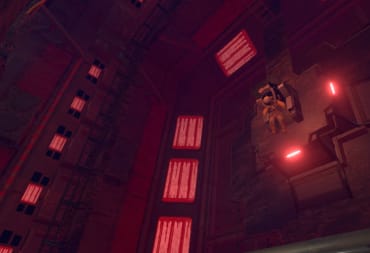
Repairing Door WO-1981
We're going to head into this hole in the wall we made for this river earlier.

Go through the hole.
Then, head southwest until you reach the facility where we had to place Crank Generators to open the door.

Head inside the facility.
Toward the back is a locked door which can be open by inserting 40 Processor Units. Do so, and this is what you'll find:

We'll find the following items inside:
- Craft Speed II Upgrade Module
- Mining Charge (Scannable)
- Inserter Databank Entry
- Paladin Databank Entry
The Paladin Databank entry, in particular, will activate a distress call for us to investigate. But first, we're going to need to make use of our new tech.
Building Another Core Composer
Before we renovated the Plantmatter farm and set up all of our new tech, I told you to make 445 Research Cores. If you haven't, you should get moving on that now.
We're going to need to place all of these Research Cores somewhere. Unfortunately, our first Core Composer is looking a little... cramped.

Do whatever you have to do to place at least 85 Research Core 350nm (Purple), even if you have to do it by hand.
Next, open up the Tech Tree and unlock the following:
- Science / Electric Components / Core Composer
Now we'll be able to actually Craft additional Core Composers. Start Crafting a Core Composer.
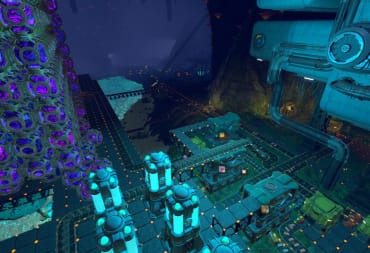
Head over to the Production Terminal Victor. This massive cave has a serious advantage: high ceilings. Here's what you'll be constructing:

We're going to place a Core Composer on an elevated platform. Place a Container nearby to feed Research Cores into it. Place a Water Wheel and two Crank Generators underneath.
Then, feed the 360 remaining Research Core 380nm (Purple) into the Container. The Core Composer will start placing Research Cores.
Unfortunately, it may take some time for all of these Research Cores to be placed. Simply wait a short time for all the Research Cores to be placed. Once they are, unlock the following in the Tech Tree:
- Terraforming / Cooling Systems / Mining Charge
- Synthesis / Shiverthorn Processing / CraftSpeed II
The Mining Charge will be needed to get Atlantum Ore. CraftSpeed II is simply nice to have; it will allow us to Craft items by hand 150% faster.
Setting Up a Shiverthorn Farm
Head back to Production Terminal Lima. We're going to quickly set up a farm for Shiverthorn.

This is a pretty simple setup. Two Planters feed into two Threshers to produce Shiverthorn Seeds and Shiverthorn Buds. The Shiverthorn Buds are processed in the second set of Threshers to make Shiverthorn Extract and Plantmatter.
The Plantmatter can be diverted toward our Plantmatter farm to increase production. Finally, the Shiverthorn Extract can be used to make Mining Charges.
We'll need Kindlevine Extract, Shiverthorn Extract, and Plantmatter Frames. You can grab Kindlevine Extract and Plantmatter Frames from our existing infrastructure. Shiverthorn Extract can be acquired from the new farm we just built.
Craft at least 40 Mining Charges.
We're also going to need the following to open up a door at our destination:
- 300 Copper Wire
- 40 Cooling Systems
Cooling Systems are Crafted with Shiverthorn Coolant and Mechanical Components. Shiverthorn Coolant is Crafted with Iron Components, Shiverthorn Extract, and Limestone.
Before you make your trip to the Emergency Beacon, I recommend that you make sure you have all of the following items:
- 40 Mining Charge
- 300 Copper Wire
- 40 Cooling System
- 900 Iron Ingot
- 900 Copper Ingot
- 900 Processor Unit
This will allow us to take care of the problem at the Emergency Beacon and activate the next Tier at Production Terminal Victor.
To the Emergency Beacon
When you're ready, head toward the Emergency Beacon that was activated. You'll have to walk past Production Terminal Victor and follow the river. When you get there, you'll find our first bit of Atlantum blocking the way.

Use Mining Charges to dig through the Atlantum Ore and the ground, keeping a focus on heading toward the Emergency Beacon marked "EB."
Make sure to collect at least 450 Atlantum Ore while you're in this area; we'll need it soon.
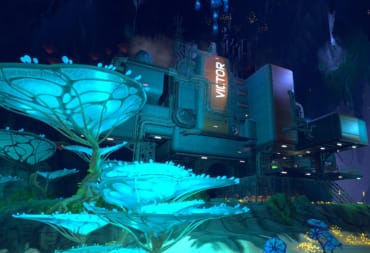
As you get closer, you'll eventually see the slightest hint of a facility:
![]()
Head into the facility marked by the Emergency Beacon. In the immediate area, you'll find the following:
- An Audio Log
- Toolbelt III Upgrade Module
You'll also see a doorway in the floor. It requires 40 Cooling Systems and 300 Copper Wires to open; that's why we Crafted them in advance.
Repair the door and head in. Sparks will tell you that this is the wreckage of the Excalibur, a ship that was part of your expedition to the planet.
There's a fair amount of stuff to Scan and loot here. Inside, you'll find the following:
- 4 Accumulator
- 2 Water Wheel
- Research Core (Blue) Fragment
- Accumulation II Upgrade Module
- M.O.L.E. T-59 (Tunneling) Upgrade Module
- M.O.L.E. F-77 (Flatten) Upgrade Module
- HEAVENEYE Orbital Satellite Databank Entry
As you progress through the ruins of the Excalibur, you'll find the source of the signal:

Unfortunately, it looks like the person we were coming to rescue is dead. This was a man known as "Paladin," the apparent captain of the ship.
There is still more to explore in this ship, though. Drop below the chair and you'll find a green cube storing the consciousness of Paladin.

While Paladin and Sparks have a conversation, keep moving through the tunnel.
A short distance later, you'll drop down into an isolated cave. Keep walking ahead and you'll eventually get very close to a river. Use your Mining Charges or The M.O.L.E. to dig through and you'll find yourself right behind Production Terminal Victor.

Go over to Production Terminal Victor.
Before we complete our objective, we're going to pick up a piece of technology.

These items give us access to the Long Inserter, a prerequisite for making the Fast Inserter. If desired, these can be used for more flexible factory configurations.
Returning to Victor
Return to Production Terminal Victor and place all of the resources required inside. We'll then unlock the next Tier of production.
This is the stopping point of our walkthrough for now. You should now have a pretty firm grasp on setting up factories and producing the resources you need. There's still a ton more to explore in this game -- good luck!
< Cooling Systems | Atlantum Processing
We've reached the end of our Techtonica Atlantum Processing Walkthrough. Check out our other guides below!
Have a tip, or want to point out something we missed? Leave a Comment or e-mail us at tips@techraptor.net
One of my earliest memories is playing Super Mario Bros. on the Nintendo Entertainment System. I've had a controller in my hand since I was 4 and I… More about Robert N