Sit back, relax. It's time to regale you the wondrous tale of Valve's most iconic Gnome. Chompski is a recurring garden gnome in some of Valve's games. In Half-Life 2: Episode 2, he can be brought along the entire ride and stuffed in the rocket right at the end for a special achievement. In Left 4 Dead 2, he can be unlocked by scoring 750 points in the shooting gallery minigame, after which you must take him all the way to the Rescue vehicle. This humble garden gnome is no doubt one of the most coveted running gags for achievement mechanics. And, sure enough, he makes a return in Half-Life: Alyx for the Gnome Vault of My Own achievement. Read further below in this guide for some valuable tips and tricks to make your trek considerably easier.
Half-Life: Alyx - Gnome Vault of My Own Achievement

The achievement is not locked behind any difficulty, so it's highly recommended to take on this challenge on the Story difficulty, where enemies take very few shots to take down and your health is plenty.
Furthermore, it's advisable to focus your upgrades towards the pistol for this run if you opt to go for the Story difficulty. It'll take out most enemies with two headshots, and one for regular headcrabs. Some other enemies require multiple shots, but these rarely will come up close unless you let them. Whichever weapon you choose, the best upgrades to first go for are the ones that enhance your precision, be it the laser or holo targeting, depending which you shoot better with.
While the grenade launcher attachment for the shotgun is a great upgrade, and the laser sight a very useful bonus to it, you'll very rarely be in need of it since enemies don't cluster up frequently enough. With Gnome Chompski in your non-dominant hand most of the time, you'll want to make the most use of your rounds as reloading ammunition of grenades will require you to drop him somewhere.

Another piece of general advice is to leave Gnome Chompski behind somewhere safely during open combat encounters or large puzzles. He doesn't despawn, but can irretrievably fall in a bottomless pit, especially towards the end of the game. Leave him behind during large encounters, but never behind a door as some doors may lock themselves to prevent you from backtracking, locking him behind. I'll bring this suggestion up again a few times on specific few moments where its safe to leave him behind for a prolonged period.
Finally, be mindful of your use of explosives. When not held, Gnome Chompski can be hit by any explosions near him and sent off somewhere. It's possible to find and retrieve him, but it's a very large risk. And of course, abuse that quicksave button.
Chapter 1 - Search & Rescue
Until you reach the courtyard where Russel throws you his loaner of a pistol, you're free to do whatever you please. Take in the sights, pick up a piece of bread and toss it at the pigeons. When you finally reach the courtyard, gravity gloves in tow, look around behind the fence as shown in the screenshot below, to spot your future partner in crime.

Let's establish a few unspoken rules and facts when it comes to Half-Life: Alyx and Gnome Chompski. When you arrive at a loading area, everything in the loading area room persists through the loading screen. As long as Gnome Chompski (or any other item of preference) is present in the room, held or not, he'll be there when the loading screen ends. There are some exceptions and nuances to this that I'll bring up at the end of Chapters 4 and 10 that you'll want to keep an eye out for.
Having said that, feel free to toss Chompski on the train and board it yourself. Once you're in, the next chapter loads. Also, don't forget to give him a kiss on the nose. It's for good luck.
Chapter 2 - Practicing Placement

Once off the train, you'll get an overlook of a big yard that you'll reach a little later. At the end of it is a large metal door blocking your way. Metal doors blocking your way will be a recurring theme throughout Half-Life: Alyx, so use these opportunities to practice finding a good resting place for Chompski while you go take care of the puzzles required to open the door. The best places to plant him are near the door you're looking to get through, but not too close so you don't risk him getting punted away if the door happens to be particularly vicious in its movement. And of course, never forget to quicksave after placing him. These saves are an invaluable backup in case something goes wrong.
Chapter 3 - Gore Gallery

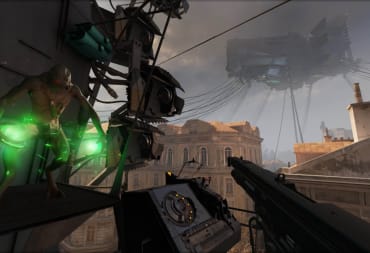
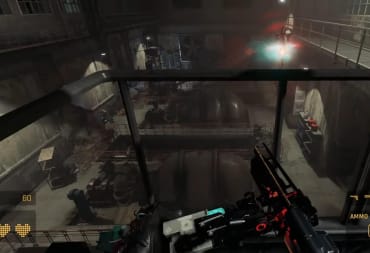
Chapter 3 in the game will introduce some of the game's most frequent themes: Darkness. In order to venture through the dark on the left of the picture (where I'm pointing), you first need to go right, solve a puzzle, grab a pocket flashlight and survive a few encounters. This is an ideal place to leave Chompski behind, as the position shown above keeps him far enough away from any hostiles that will show up on your return.

After traversing some more through the chapter, you'll run into the explosive Xen infestation—hallway after hallway of infestation that's stubbornly holding on to explosive barrels, and if even one of them lights up, it's curtains for Alyx. Early on when encountering this section, you'll find a rolling door that needs a wheel in order to lift it. You guessed it: it's a prime location to leave Chompski behind again. Considering the section, it's a very welcome breather.

Once past, all that's left to do is survive the zombie and Combine encounters and save your Dad. You can leave Chompski behind near the lever at the train tracks, as you'll need to rush back to it once the train sequence nears the end. Give him a good view of the place, and get to creating some carnage.

Chapter 4 - Subway Shenanigans

This chapter, for the most part, is pretty linear, with very few opportunities to free up your hand. Near the end, before you reach the Northern star, you'll reach a basement where you'll find lots of explosives and equally as many opportunities to use them. Leave Chompski behind somewhere safe and take out every Combine in the subway.

With Chompski still left behind, you'll climb a few stairs and finally find the Northern Star Hotel. Once you do, go retrieve Chompski and make your way into the Hotel. Here's the first bit of bad news I'm going to have to impart to you: Despite the fact that you exit the Hotel from the same side a chapter later, the area will reset on your return. The only things that truly persist during this run are the items you bring along during a loading screen. I've wasted about an hour of my time in order to test this.
Chapter 5 - Haunting Hotel

As I've warned you about before, anything you wish to bring along must be brought along in the loading screens as well, held or not. Part of the Hotel's level layout revolves around climbing the hotel vertically while the stairs and elevator are broken. You can leave Chompski behind on the stairs at the bottom floor so you can focus on fixing the elevator access, but be sure to bring him along once you're on the level above him since you'll encounter a level load after and Chompski absolutely disappears if you didn't bring him along, despite the fact you can see the bottom a few stories higher.

It's worth pointing out that every so often, as shown above, you'll run into armored doors that need a power source to open. In all cases, it's safe to leave Chompski behind and find the power source. Usually, you won't have to travel too far, but you'll always have to come back to put the power source in, making it an ideal place to have Chompski watch your back for any stalkers.

One of the last sections that you'll spend in the Hotel is the black headcrab pit. At the very top is a Combine energy barrier, and the power source is at the very bottom, through a door only accessible by dropping down in the pit. It's highly advised to first climb up, place Chompski near the barrier, and then go through the cellar to deactivate the power source. Once darkness sets in, black headcrabs will spawn at several sections and you'll want your reload hand to be free.
Chapter 6 - Surface Suspense

This chapter doesn't have many optimizations going on for the Chompski run. There's a vertical puzzle room with a scissor lift where you can drop him down for a short while as your goal is to reach the bottom. The other puzzle area ends up with you moving a platform crane that starts at the bottom and you need to fix the electricity in order to get it up so it can be a stepping stone into the next area, which is accessed up high. You can leave Chompski behind on said platform and pick him up when you're about the exit the puzzle area.
Chapter 7 - Jolly Jeff

This chapter in particular rewards those who have beaten it before, as it makes the puzzle rooms a breeze since half the challenge is figuring out how to keep good ol' blind Jeff from murdering you viciously whenever you make a sound. Leave Chompski behind near the elevator, solve the puzzles, then awkwardly share a claustrophobic space with our Mozart of murder.

After that, you're tasked with retrieving three energy cores, but thankfully the receptacles you need to put them in are pretty centralized. Up until you unlock the route to the next chapter, you can leave Chompski behind on a tactical spot for easy retrieval.
Chapter 8 & 9 - Angry Antlions & Cross Combine
Almost no optimizations available for these two chapters. Either it's hallways, combat with the enemy, or puzzles that block your path with no real opportunities to leave Chompski behind for prolonged periods. If you're on any difficulty other than Story or Easy, be sure to make good use of these moments to stock up on ammo. If you're on Story mode, feel free to shoot at the wooden planks that bar several of the doors you encounter. Not only will the game not count past 1,000 stored bullets, but any magazines you store in your backpack will effectively vaporize and not be made available for use. Then again, when you've got 1,000 pistol rounds, do you still need to worry about wasting a few?
Chapter 10 - Frantic Finish

Most of this chapter will play out the same as before. You're near the end, so it makes sense to only go forward, so make sure to keep Chompski with you at all times, maybe stashing him briefly while combat ensues. Once you've made it to the end of the first half, the part where you extend the walkway, be sure to hold on tight to Chompski when the Vault is about to drop. Keep holding on to him even as your vision turns to white and then black. You're only safe as soon as the loading screen arrives. Once the game's done loading, you'll know you're successful when you're still holding on to him afterward or he drops right at your feet. You might've been tossed about by an explosion coming from a giant, alien wreckage, but there's no stronger bond than that between a girl and her garden gnome.

After the explosion, there's one thing left to do: Bolt for the exit and dodge those Strider shots! Whenever you're in a safe spot, make sure to reload all your weapons (attach a grenade to your shotgun and cock it if you got the upgrade), map out where to dash next and sprint towards the finish while deftly taking out any Combine opposition in your way. Finish the Strider boss fight using the grenade turret and gaze at the green beam of light. Step into it while holding on to Chompski and pat yourself on the back, because you just made it to the end. Chompski will float off together with all your weapons and the bizarre final chapter ensues, followed by a very cathartic experience right before the end. Then you'll earn the Gnome Vault of My Own achievement.
Final Words
Half-Life: Alyx is an impressive VR game, and sports item persistence much like the previous games. In case you hadn't noticed on the screenshots, I brought along a rat from Chapter 2 and carried him and Gnome Chompski along with me throughout the rest of the run. I'm fairly confident you can do a Chompski run with pretty much any item, but only the Gnome will grant you the achievement. Maybe next time I'll try bringing along a headcrab. Might nickname it Lamarr, even!
Have a tip, or want to point out something we missed? Leave a Comment or e-mail us at tips@techraptor.net

Former Staff Writer at TechRaptor.