In Persona 5 Strikers when you're not investigating the mysteries of the Jails, fighting off hordes of Shadows, or hanging out with your friends you'll find yourself very quickly building up your list of requests to complete. The requests in Persona 5 Strikers are the optional side quests available in the game. You can get all manner of rewards from them including money, consumable items, weapons, and unlockables. None of this is necessary, but you'll find that it doesn't ever take you too far off the beaten path and is probably going to be more worth it for you in the long run.
In this guide, I've listed each of the requests and what day they arrived in my request queue. Depending on where you are in a palace requests that don't appear at the start of the day might appear by the end of the day. Each time I've received new quests that have been during the day or through specific means the requirements for it to appear have been noted down. Persona 5 Strikers is different from other Persona titles as you can return to previous dungeons, in this game Jails, so requests will have to travelling all over to be completed.
Persona 5 Strikers Request
There are also separate guides to go more in-depth about Mona's Forgotten Desire Requests, Lavenza's Prison Mail Requests, and the Powerful Shadows Requests. For completing Persona 5 Strikers there are a few rewards you'll get along the way:
- What are Friends For? Trophy/Achievement - Cleared all special requests from Phantom Thieves
- A Helping Had Trophy/Achievement - Completed a request
- Those Who Heed the Call Trophy/Achievement - Completed 50 requests
- For completing the final request you unlock New Game+ Mode
Dates Requests Are Received
- August 2nd
- August 3rd
- August 8th
- August 11th
- August 17th
- August 18th
- August 24th
- August 25th
- August 28th
- August 29th
- Post Game Requests
All Persona 5 Strikers Requests
The first request you get is after you've completed the first Jail, you'll always be able to see when new requests come in by checking for the notification on the left-hand side of your screen. You can accept requests from your hideout and monitor them from the pause menu. Be warned that if you scroll too far past where you are in the game locations, important character names, or more could be revealed.
August 2nd
Title: Take Back the Desire
Location: Shibuya Jail - Shibuya Crossing
To-Do: Defeat remaining Shadows
Reward: Motto Hoodie (M) --- 76 Def and +Null Brainwash
Click here if you want to return to the top
August 3nd
Title: Prison Mail, Part 1
Location: The Velvet Room
To-Do: Show Archangel with Amria Drop to Lavenza
Reward: Diarama Skill Card
Note: For more information on fusing this Persona check out our Prison Mail Guide
Title: Cold-Blooded Treatment
Location: Sendai Jail - Aoba St. 1st Ward and Hirose St
To-Do: Defeat Lamia by striking weakness
Reward: Muramasa (Yusuke) - 94 Dmg and Ag +2
Repeat Reward: Quickfix Alpha
Note: Lamia are weak to Ice
Title: Gusts of Punishment
Location: Shibuya Jail - Side path of Castle: Front Area
To-Do: Defeat Succubus by striking weakness
Reward: Headhunter Ladle S (Morgana) - 84 Dmg and +Critical up (Low)
Repeat Reward: Rice/Onion
Note: The location you will find the Succubus is where you fought the flying gatling gun shadow. Succubus are weak to Wind and Bless damage.
Title: Painful Past: Alice Hiiragi
Location: Shibuya Jail - Castle: Front Area
To-Do: Defeat Mad Rabbit Alice
Reward: BOND Exp
Repeat Reward: ¥2,500

Missable
Requirement: Respond to Ann's text message
Title: Sendai Sweets
Location: Sendai
To-Do: Deliver 1x Zunda Shake, 1x Zunda Daifuku, 3x Gyutan Ice Cream
Reward: BOND exp
Note: All of the items that Ann is after can be purchased at the nearby shops
Requirement: Complete Sendai Sweets request
Title: Lending a Paw
Location: Mt. Aoba Park
To-Do: Deliver 1x Zunda Supreme
Reward: BOND Exp
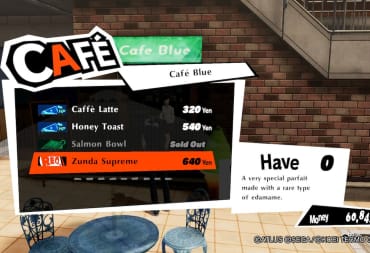
Note: Talk to people in the Mt. Aoba Park area. One near the shrine information booth and one inside the Shrine. After speaking to them head south and speak with the Fussy Manager. Travel to the Sendai Station and speak to the man grumbling near Futaba. Return to the Fussy Manager and you will be able to purchase the Zunda Supreme from the Blue Cafe right next to you.
Click here if you want to return to the top
August 8th
Title: Trapped in Wonderland
Location: Shibuya Jail
To-Do: Deliver 1x Forgotten Desire
Reward: More Accessories Available in Sophia’s Shop
Note: For more information on obtaining Forgotten Desire #1 check out our Forgotten Desire Guide
Title: Sophia’s Weapon Shop (Repeatable)
Location: Sendai Jail
To-Do: Defeat 20x High Pixie
Place: West Garden and Hirose St.
Reward: More Weapons Available in Sophia’s Shop
Repeat Reward: ¥1,200
Title: Sophia’s Armor Shop (Repeatable)
Location: Sendai Jail
To-Do: Defeat 5x Orthrus
Place: Hirose St.
Reward: More Armor Available in Sophia's Shop
Repeat Reward: Medicine
Title: Junk Colleection, Part 1
Location: Shibuya Jail
To-Do: Deliver 15x Chipped Microchip
Reward: Hacker Gear Mk. 2 (Futaba)
Repeat Reward: ¥19,200

Title: Painful Past: Ango Natsume
Location: Sendai Jail - Castle: Front Area
To-Do: Defeat Nightmare Dragon Ango
Place: Castle: Front Area
Reward: Unlocks level cap for BOND skill
Repeat Reward: ¥3,000
Click here if you want to return to the top
August 11th
Title: Prison Mail, Part 2
Location: The Velvet Room
To-Do: Show Eligor with Divine Grace to Lavenza
Reward: Rebel Soul Skill Card
Note: For more information on fusing this Persona check out our Prison Mail Guide
Title: Prison Mail, Part 3
Location: The Velvet Room
To-Do: Show Kaiwan with Makouga to Lavenza
Reward: Soul Thief Skill Card
Note: For more information on fusing this Persona check out our Prison Mail Guide
Title: Trapped in a Nightmare
Location: Sendai Jail
To-Do: Deliver 1x Forgotten Desire
Reward: More Accessories Available in Sopia’s Shop
Note: For more information on obtaining Forgotten Desire #2 check out our Forgotten Desire Guide
Title: Enduring a Slimy Hell
Location: Sendai Jail - Sendai Station and Aoba St. 1st Ward
To-Do: Defeat 50x Slime with Joker
Reward: Arsene’s Cane S (Joker) - 118 Dmg and +Random Ailment (low)
Repeat Reward: ¥1,800
Note: The easiest place to defeat 50 slimes is at the very beginning of the Sendai Jail. Practically every encounter here begins with a wave of slime and if you manage to Ambush the shadows you can immediately perform an all-out attack (as long as you’re using Joker to initiate the attack all of the kills will count towards the total).
Title: Sub-Zero in Sapporo
Location: Sapporo Jail - Suzushino and Odori Park
To-Do: Defeat 20x Jack Frost by striking weakness
Reward: More Groceries Available at Sophia’s Shop
Repeat Reward: Hot and Sour Tea
Note: Jack Frost are weak to Fire
Title: Blessing the Wicked
Location: Sapporo Jail - Suzushino and Odori Park
To-Do: Defeat 3 Lilim by striking weakness
Reward: Water Yo-Yo (Sophia)
Repeat Reward: Lamb Meat/Pork/Flour
Note: Lilim are weak to Air
Title: Psychokinetic Siege
Location: Sapporo Jail - Sapporo Clocktower and Castle: Front Area
To-Do: Defeat 3x Setanta by striking weakness
Reward: Death Contract S (Haru) - 134 Dmg and +Fear (Low)
Repeat Reward: ¥2,200
Note: Setanta are weak to Psychic
Title: Bug Blaster
Location: Sapporo Jail - The Arboretum and Sapporo Tower
To-Do: Defeat 8x Mothman by striking weakness
Reward: More Groceries Available at Sophia’s Shop
Repeat Reward: Super Jolt
Note: Mothman are weak to Guns

Title: Cursing Those On High
Location: Sapporo Jail - Castle: Front Area
To-Do: Defeat 3x Principality by striking weaknes
Reward: Unlocks level cap for BOND skill
Repeat Reward: ¥2,600
Note: Principality is weak to Curse. Level cap for stat-boosting BOND skills has been increased.
Title: Nuking the Stars
Location: Sapporo Jail - Sapporo Tower and Castle: Front Area
To-Do: Defeat 3x Kaiwan by striking weakness
Reward: Death’s Claws (Makoto) - 126 Dmg and Ma +2
Repeat Reward: Donut-Worry
Note: Kaiwan is weak to Nuclear
Title: Junk Collection, Part 2
Location: Sendai Jail
To-Do: Deliver 12x Strange Circuit
Reward: Unlocks level cap for BOND skill
Repeat Reward: ¥28,800
Note: Level cap for Extortionist BOND has been increased

Missable
Requirement: Speak to Ryuji in Sapporo: Suzushino after he texts you on 8/11. After he creates a request accept it from the hideout
Title: Love Soupreme - Missable
Location: Sapporo
To-Do: Deliver 2x Meal Tickets
Reward: BOND Exp
Note: Talk to the man in the white shirt in front of the red pharmacy on the west corner of the intersection at Suzushino. After this conversation, Sophia will put in another request (details below). After the below quest has been completed you can return to this man and he will sell you the required Meal Tickets for ¥800 (Make sure you buy 2)
Requirement: After talking to the man outside Akagire in Suzushino for the previous quest
Title: The Apothecary’s Connection - Missable
Location: Sapporo Jail
To-Do: Defeat 10x Mothman with Sophie
Place: The Arboretum and Sapporo Tower
Reward: BOND Exp
Click here if you want to return to the top
August 17th
Title: Prison Mail, Part 4
Location: The Velvet Room
To-Do: Show Mitra with Regenerate 1 to Lavenza
Reward: Charge Skill Card
Note: For more information on fusing this Persona check out our Prison Mail Guide
Title: Trapped in a Frozen Hell
Location: Sapporo Jail
To-Do: Deliver 1x Forgotten Desire
Reward: Unlocks level cap for BOND skill
Note: For more information on obtaining Forgotten Desire #3 check out our Forgotten Desire Guide. Level cap for Bondmaker BOND has been increased
Title: Junk Collection, Part 3
Location: Sapporo Jail
To-Do: Deliver 12x Integrated Circuits
Reward: Resilient Scarf (Morgana)
Repeat Reward: ¥54,000
Title: Painful Past: Mariko Hyodo
Location: Sapporo Jail
To-Do: Defeat Snow Empress Mariko
Place: Castle: Front Area
Reward: BOND Exp
Repeat Reward: Tuna/Beef
Missable
Requirement: Speak with Makoto on the beach after completing the initial investigation on the Okinawa docks
Title: Beachside Blast
Location: Sapporo Jail - Suzusino and Odori Park
To-Do: Deliver 1x Whole Watermelon and defeat 10x Jack Frot with Queen
Reward: Bond Exp
Note: The Whole Watermelon can be purchased from the beach bar for ¥800.
Click here if you want to return to the top
August 18th
Missable
Requirement: Speak with Yusuke after he texts you.
Title: Okinawan Art Appreciation
Location: Okinawa Jail - Research Lab and Document Storage Area
To-Do: Defeat 10x Shiisaa with Yusuke
Reward: Shiisaa Ornament Key Item
Note: Enter the Okinawa Jail and go to the North checkpoint. Head north and then turn left and ambush the Shadow through the glass. This will spawn more than 10 Shiisaa, after an all-out attack the request will be completed.
Click here if you want to return to the top
August 24th
Title: Prison Mail, Part 5
Location: The Velvet Room
To-Do: Show Unicorn with Zionga to Lavenza
Reward: Unlocks level cap for BOND skill
Note: For more information on fusing this Persona check out our Prison Mail Guide
Title: Trapped in Ruins
Location: Okinawa Jail
To-Do: Deliver 1x Forgotten Desire
Reward: Divine Grace Skill Card
Note: For more information on obtaining Forgotten Desire #4 check out our Forgotten Desire Guide
Title: Sophia’s Weapon Shop Redux
Location: Kyoto Jail - Beckoning Cat Square
To-Do: Defeat 5x Neko Shogun with a phantom dash
Reward: More Weapons Available at Sophia’s Shop
Repeat Reward: ¥8,000
Note: There are very limited places to encounter Neko Shogun that also have objects to Phantom Dash off. It’s recommended you only enter with Joker to make sure the rest of your team doesn’t kill them off too fast.
Title: Sophia’s Armor Shop Redux
Location: Kyoto Jail - Fox Couple Statue
To-Do: Defeat 10x Koppa Tengu with Wolf
Reward: More Armor Available at Sophia’s Shop
Repeat Reward: Niuhuang Dan
Title: Shocking the Scum
Location: Okinawa Jail - Experiment Area
To-Do: Defeat 20x Black Ooze by striking weakness
Reward: Demon Pipe (Ryuji)
Repeat Reward: Revival Bead
Note: The Black Ooze can be found at the very beginning of the Okinawa Jail. Black Ooze is weak to Electricity and Light attacks.
Title: Elegant Experiment
Location: Anywhere
To-Do: Defeat 8 enemies in a single Showtime
Reward: More Groceries Available at Sophia’s Shop
Repeat Reward: ¥4,800
Title: Junk Collector, Part 4
Location: Okinawa Jail
To-Do: Deliver 12x Strange Discs
Reward: Hacker Gear, Mk. 4 (Futaba) - 204 Def and +50 HP
Title: A Thief’s Challenge: Panther
Location: Shibuya Jail
To-Do: Reach location indicated without using quick travel or increasing the security level.
Reward: More Accessories Available at Sophia’s Shop
Repeat Reward: Purifying Ash
Note: Your goal in this request is to make it back to the Underground Waterway where you first met Sophia at the start of the game. From where you begin in Shibuya Jail Entrance you’ll head out the Sibuya Station: West Exit path. From there head into the Underground Waterway. Once in the Underground Waterway, it’s a straight shot back to the request marker.
In the large square rooms in the Underground Waterway, you can hug the sides of the wall, or even just rush quickly through the middle to get by. Once you get to the sentry rooms you should be more aggressive, ambushing them as soon as you can.
While it says that you can’t quick travel or increase the security level that means that you can still successfully ambush and attack enemies to begin combat. Even if a Shadow thinks he hears something and begins to investigate as long as he doesn’t find you the security level will not raise. It’s only when you get caught off guard that you’ll fail this request. If you DO happen to fail this quest you’ll need to exit the jail and re-accept the request from the hideout. I recommend saving before attempting so you can reload save as a faster way to restart the quest.

Missable
Requirement: Talk with Zenkichi in the north area of Osaka: Shisekai after he texts you
Title: Cooking Papa
Location: - - - - -
To-Do: Get Haru and Futaba to teach Zenkichi cooking
Reward: BOND Exp
Note: You’ll find Haru at the Dotonbori: Shopping St quick travel, and Futaba at Shinsenkai: Tower. Speak with Haru first, she will give you a new request for the shopping ingredients required. Once you’ve completed “Obanzai Ingredients” request speak with Futaba to get a new request. After completing “Forging the Ultimate Menu” this quest will also be completed.
Requirement: Speak with Haru after accepting the “Cooking Papa Quest”
Title: Obanzai Ingredients
Location: - - - -
To-Do: Deliver 1x Kamo-Nasu Eggplant, 1x Tofu, 1x Beef
Reward: Obanzai Recipe
Note: If you’ve been completing all of the quests up till this point then all of these items should be purchasable in Sophia’s Shop
Requirement: Speak with Futaba after completing the “Obanzai Ingredients” request
Title: Forging the Ultimate Menu
Location: - - - - -
To-Do: Deliver 1x Kyoto Curry, 1x Miso Ramen
Reward: BOND Exp
Note: Cook these two foods, you should have picked up the recipes along the way or can purchase them from Sophia’s Shop for a much-inflated price.
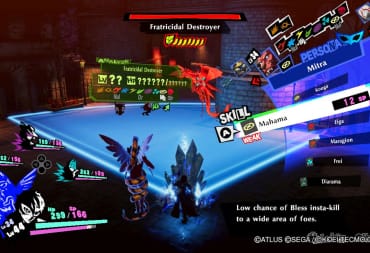
Title: An Ebon God Descends
Location: Sendai Jail - Side path of Castle: Front Area
To-Do: Defeat the Fratricidal Destroyer
Reward: Beastly Was-Sceptre Fusion Item
Repeat Reward: ¥13,200
Note: For more information on defeating the Fratricidal Destroyer check out our Powerful Enemy Guide
After collecting the three items in this Jail I found that more quests had been added
Title: Prison Mail, Part 6
Location: The Velvet Room
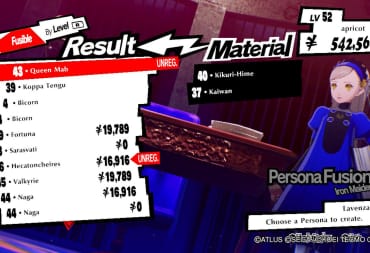
To-Do: Show Queen Mab with Technical Adept to Lavenza
Reward: Unlocks level cap for BOND skill
Note: For more information on fusing this Persona check out our Prison Mail Guide. Level cap for Persona ability boosting BOND skills has increased.
Title: Trapped in Shrine Gates
Location: Kyoto Jail
To-Do: Deliver 1x Lost Desire
Reward: Concentrate Skill Card
Note: For more information on obtaining Forgotten Desire #5 check out our Forgotten Desire Guide
Title: Junk Collection, Part 5
Location: Kyoto Jail
To-Do: Deliver 9x Suspicious Text Date
Reward: Masquerade Whip S (Ann) - 172 Dmg and +Dizzy (low)
Repeat Reward: ¥72,000
Title: Junk Collection Part 6
Location: Osaka Jail
To-Do: Deliver Vague File List
Reward: Rune Amulet - Ma + 5
Repeat Reward: ¥84,000
Title: A Thief’s Challenge: Fox
Location: Sendai Jail
To-Do: Reach location indicated without using quick travel or increasing the security level.
Reward: Knight’s Crest - All Stats +1
Repeat Reward: Goya/Tofu/Carrot
Note: This request follows the same rules as the previous Thief’s Challenge for Panther. You will be making your way from the Sendai Jail Entrance all the way to the West Garden. From the Sendai Station head West to the Aoba St. 1st Ward and continue ahead to get to West Garden.
In the Aoba St. 1st Ward there is a wall of sentries covering the path pretty well but they do come close enough to the cop car on the left side of the road that you can ambush them. From there hug the left wall and transition into the West Garden. As you get to the end of West Garden you might think everything is nice and easy-going, until you remember the 2D platforming section of the level. I recommend saving in the previous area before heading in so you have a point you can load from in the Config menu.
Title: A Thief’s Challenge: Noir
Location: Sapporo Jail
To-Do: Reach location indicated without using quick travel or increasing the security level.
Reward: More Groceries Available in Sophia’s Shop
Repeat Reward: ¥10,000
Note: Another request forcing you to get through the world competently. Here you will be travelling from the Sapporo Jail Entrance to the Hill Above the Keep. To make this journey you’ll need to pass straight through Suzushino to Odori Park and then take the first right to Sapporo Tower. Here you’ll climb up the hill and slide down to the requested point.
There aren’t any very tricky aspects aside from using the mini-map to time when you reach the roof in the first area, and that you need to snowboard directly into the required point.
Title: A Thief’s Challenge: Skull
Location: Osaka Jail
To-Do: Defeat 5x Valkyrie and 20x Naga
Reward: Unlocks level cap for BOND skill
Repeat Reward: Bead
Note: The fastest place to run into Valkyrie and Naga is at the Mt. Chashiro checkpoint. From here complete the battles outside and at the base of the cage and you should have this challenge completed in no time. The level cap for Stat Boost BOND skills has been increased.
Title: A Thief’s Challenge: Wolf
Location: Sendai Jail - West Garden and Hirose St
To-Do: Defeat 10x High Pixie with a phantom dash
Reward: Traffic Sign (Zenkichi) - 234 Dmg and En +5
Repeat Reward: Life Stone
Note: The trick with this request is finding locations where you can find both High Pixie’s as well as objects to phantom dash from. Best bets are near the powerful foe in West Garden or in the main shopping plaza of Hirose St where the swords are.

Title: The Hound of Hades Howls
Location: Osaka Jail
To-Do: Defeat the Guard Dog of Hades
Place: Juoji Zoo
Reward: Collar of Hell Fusion Item
Note: For more information on defeating the Guard Dog of Hades check out our Powerful Enemy Guide.
Click here if you want to return to the top
August 25th
Title: Elegant Experiment Extended
Location: Anywhere
To-Do: defeat 12 enemies in a single Showtime
Reward: more items available in Sophia's Shop
Repeat Reward: ¥13,000
Title: A Thief's Challenge: Queen
Location: Okinawa Jail
To-Do: Reach location indicated without using quick travel or increasing the security level.
Reward: HP Incense
Repeated Reward: ¥12,000
Note: Make it through the linear Okinawa Jail to where the cranes are. The hardest section is the 2D sidescrolling section.
Title: A Thief's Challenge: Sophie
Location: Kyoto Jail
To-Do: Reach location indicated without using quick travel or increasing the security level.
Reward: unlocks level cap for BOND skill
Note: For this Thief’s challenge you need to make it all the way from the start of the Kyoto Jail to the very end of the map. This looks like it will be more complicated than it is, but it’s placed at the least confusing location.
Run through the Jail like normal until you reach the Fox Couple Shrine. From here fight the shadows that appear, and then head through the Fox Couple Shrine portal and you’ll be on the path right before the request location. You’ll need to face 3-4 battles along the way, but most have ambush opportunities so they’re all easy enough.
Level Cap for Safecracker BOND skill has increased
Title: Make Way for the Frozen King
Location: Sapporo Jail - The Arboretum (Slide down the snowboarding hill)
To-Do: Defeat the Monarch of Snow
Reward: Giant Snow Crystal fusion item
Repeat Reward: Hiranya
Note: For more information on defeating the Monarch of Snow check out our Powerful Enemy Guide.

Title: Halt the Strutting Little Imp
Location: Shibuya Jail - Shibuya Crossing
To-Do: Defeat the Fallen Snowman
Reward: Evil Snow Crystal fusion item
Repeat Reward: Cabbage/Kamo-Nasu Eggplant
Note: For more information on defeating the Fallen Snowman check out our Powerful Enemy Guide.
Click here if you want to return to the top
August 28th
Title: Prison Mail, Part 7
Location: The Velvet Room
To-Do: Show Trumpeter with Diarahan to Lavenza
Reward: Regenerate 3 Skill Card
Note: For more information on fusing this Persona check out our Prison Mail Guide.
Title: Trapped in a Dystopia
Location: Osaka Jail
To-Do: Deliver 1x Forgotten Desire
Reward: Power Incense
Note: For more information on obtaining Forgotten Desire #6 check out our Forgotten Desire Guide
Title: Employee Course Correction
Location: Osaka Jail - Juoji Station
To-Do: Defeat 5x Ganesha and 5x Raja Naga
Reward: Churrasco Recipe
Repeat Reward: Mega Purifying Ash
Title: Junk Collection, Part 7
Location: Osaka Jail
To-Do: Deliver 12x Odd Report
Reward: SP Incense
Repeat Reward: ¥70,000
Title: A Thief’s Challenge: Wolf, Pt. 2
Location: Osaka Jail
To-Do: Reach location indicated without using quick travel or increasing the security level.
Reward: More Accessories Available at Sophia’s Shop
Repeat Reward: Snuff Soul
Note: For this request, we need to make it from the start of the dungeon all the way to the VIP room ducts in Juoji Station. To get there well need to go from the entrance out the south exit to the Shipping Railway, from there head on to Juoji Station. It’s highly recommended that you’ve gone through and opened every colored door in this area so that you’re able to make it to the request marker as fast as easily as possible.

Title: Painful Past: Akira Konoe
Location: Osaka Jail - Castle: Front Area
To-Do: Defeat Akira the Hero
Reward: BOND Exp
Repeat Reward: ¥15,600
Title: Dragon Slayer Enters the Fray
Location: Kyoto Jail - Inari Taisha Main Shrine
To-Do: Defeat the Brilliant Dragonslayer
Reward: Dragon Slayer Blade fusion item
Repeat Reward: ¥11,000
Note: For more information on defeating the Brilliant Dragonslayer check out our Powerful Enemy Guide.
Title: The Writhing Nightmare Rises
Location: Okinawa Jail - Cage of Desolation
To-Do: Defeat the Throbbing King of Desire
Reward: Carnal King’s Wheel fusion item
Repeat Reward: Bead Chain (sigh…)
Note: For more information on defeating the Throbbing King of Desire check out our Powerful Enemy Guide.
Click here if you want to return to the top
August 29th
Title: Prison Mail, Part 8
Location: The Velvet Room
To-Do: Show Cu Chulainn with Concentrate to Lavenza
Reward: Mediarahan Skill Card
Note: For more information on fusing this Persona check out our Prison Mail Guide.
Title: Trapped in the Abyss
Location: Jail of the Abyss
To-Do: Deliver 1x Donated Desire
Reward: Unlocks level cap for BOND skill
Note: For more information on obtaining Forgotten Desire #7 check out our Forgotten Desire Guide

Title: Junk Collector, Part 8
Location: Jail of the Abyss
To-Do: Deliver Illegible Document
Reward: Ruyi Jingu Bang S (Ryuji) - 276 Dmg and +Auto-Tarukaja
Repeat Reward: ¥102,000
Title: A Thief’s Challenge: Mona
Location: Jail of the Abyss
To-Do: Reach location indicated without using quick travel or increasing the security level.
Reward: Magic Incense
Repeat Reward: Amrita Soda:
Note: For this challenge, you just need to get through the entire Jail of the Abyss. From the entrance, to where you fell off the central platform during the story. As the Jail is only linear corridors you’ll need to be ambushing/pre-emptively attacking every enemy you see. Probably not too different from how you normally play.
Click here if you want to return to the top
Post Game Requests
The first time you load the game after defeating the final boss you’ll start from right before its battle. You’ll first see a scene between Lavenza and Joker where you’re informed about needing to re-defeat each of the monarchs of the world in order to then face a new “terrifying foe”
Title: Prison Mail, Part 9
Location: The Velvet Room
To-Do: Show Dominion with Nuke Amp to Lavenze
Reward: Fortify Spirit Skill Card
Note: For more information on fusing this Persona check out our Prison Mail Guide.
Title: Trapped in the Great Tree
Location: Tree of Knowledge
To-Do: Deliver 1x Donated Desire
Reward: Master Coffee Recipe
Note: For more information on obtaining Forgotten Desire #8 check out our Forgotten Desire Guide
Title: Junk Collection, Part 9
Location: Tree of Knowledge
To-Do: Deliver 15x Unnatural Samples
Reward: More Armor Available in Sophia’s Shop
Repeat Reward: ¥120,000
Title: A Thief’s Special Challenge
Location: Tree of Knowledge
To-Do: Reach location indicated without using quick travel or increasing the security level.
Reward: Master Curry Recipe
Repeat Reward: ¥20,000
Note: To complete this requirement you need to make it all the way to the Hall of Contracts. This is the final area of the Tree of Knowledge. Much like the Jail of the Abyss the request is really just re-do the whole jail but without raising the security level.
Title: Painful Past: Demiurge
Location: Tree of Knowledge - Hall of Contracts
To-Do: Defeat False God Demiurge
Reward: BOND Exp
Repeat Reward: Crab/Egg/Miso
Title: Painful Past+: Alice Hiiragi
Location: Shibuya Jail - Castle: Front Area
To-Do: Defeat Mad Rabbit Alice
Reward: Naraku Whip S (Ann) - 290 Dmg and +30 SP
Repeat Reward: ¥21,000
Title: Painful Past+: Ango Natsume
Location: Sendai Jail - Castle: Front Area
To-Do: Defeat Nightmare Dragon Ango
Reward: Usumidori S (Yusuke) - 304 Dmg and +Fear (med)
Repeat Reward: ¥22,000
Title: Painful Past+: Mariko Hyodo
Location: Sapporo Jail - Castle: Front Area
To-Do: Defeat Snow Empress Mariko
Reward: Fleurs du Mal S (Haru) - 308 Dmg and Ma +5
Repeat Reward: ¥23,000
Title: Angel of Contracts Descends
Location: Tree of Knowledge - Hall of Contracts
To-Do: Defeat the Shadow of God
Reward: Contract Slab fusion item
Repeat Reward: ¥24,000
Note: For more information on defeating the Shadow of God check out our Powerful Enemy Guide.
Title: Painful Past+: Akira Konoe
Location: Osaka Jail - Castle: Front Area
To-Do: Defeat Akira the Hero
Reward: Mjolnir S (Ryuji) - 302 Dmg and +Elec dmg up
Repeat Reward: ¥25,000
Title: Painful Past+: Demiurge
Location: Tree of Knowledge - Hall of Contracts
To-Do: Defeat False God Demiurge
Reward: Forbidden Fruit (Sophia) - 292 Dmg and +Bless dmg up
Repeat Reward: ¥30,000
Note: When the party gets split up the Spheres for Party 1 are weak to Fire, Wind, Guns, Nuclear, and Ice and the Spheres for Party 2 are weak to Holy, Psy, and Elec as well as some that aren't weak to anything. It's recommended that you defeat the Spheres that cast support spells and summon additional monsters and then focus on those you have strength against.

Requirement: Defeat all Painful Past+ Missions
Title: Knocking on Death’s Door
Location: Okinawa Jail - Cage of Desolation
To-Do: Defeat the Reaper
Reward: Paradise Lost S - 300 Dmg and +Reduce Curse dmg (high)
Repeat Reward: Chewing Soul
Note: The Reaper has no weaknesses so just build yourself your best party possible, and stock up on items.
Click here if you want to return to the top
Have a tip, or want to point out something we missed? Leave a Comment or e-mail us at tips@techraptor.net

Andrew has written Video Game and Entertainment news, reviews, and guides for 10+ years. As Senior Content Manager, he assists in creating and editing… More about Andrew