Shovel Knight Pocket Dungeon sees our favorite Knight's trying to make their way through a number of different stages in order to escape. Along the way they'll face a number of different boss encounters, some far easier than others. In this Shovel Knight Pocket Dungeon Boss Encounter Guide we'll go over each of the bosses that you will encounter, what level you'll see them on, and some tips on how to defeat them.
Shovel Knight Pocket Dungeon Boss Guide - Lich Yard
Spectre Knight
The Spectre Knight will move around the arena spinning his scythe which will then take time to return to where he is. You'll want to be actively moving towards him while avoiding the direct line path that the scythe is taking.
Rocks will routinely appear around the arena, these can make chasing after the Spectre Knight a real pain so as you walk by them you'll want to take at least one or two swipes at them. The whole time this combat is happening skeleton enemies will also be dropping. Try to avoid them for as much of the fight as you can and when you see a big enough chain take them all out at once. This should also net you a decent amount of cash.
After defeating Specter Knight he will become a playable character with the following stats

Plague Knight Boss Guide
The Plague Knight fight will begin with you surrounded by rocks. Plague Knight's main mechanic is that he will routinely throw out 2-3 exploding rats. They'll land and then travel down two tiles before exploding and have a range of one tile. Try to end up between two sets of them so that you don't get caught in their explosion.
Avoid the green vials too as touching them will deal damage to your character.
When not avoiding green vials or exploding rats just do what you can to be drinking health potions and attacking the Plague Knight.
After defeating Plague Knight he will become a playable character with the following stats
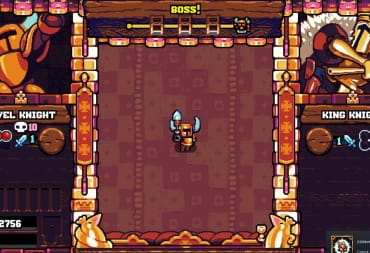
King Knight Boss Guide
This fight has the King Knight cycling through a variety of phases. None of them are particularly difficult and all of his attacks are only one block wide so as long as you're paying attention to the floors you'll be able to avoid them.
King Knight starts by hopping around the arena, if he happens to land next to you take a swing at him otherwise just keep trying to move towards him. After jumping he'll stay in place for a while, this is a good time to attack him. Blocks, skeletons, and health potions will begin to drop down from the ceiling during the later stages of his hopping phase. If you've taken some damage prioritize getting back to max HP now.
After hopping the King Knight will make short dash attacks. The floor will display a warning sign the same way that it does for bombs, just make sure you're not in the path of these attacks. The closer you are to his endpoint the better for a few more quick attacks. The King Knight will also attack any other enemies in his line so it can sometimes be helpful.
After defeating King Knight he will become a playable character.
Shovel Knight Pocket Dungeon Boss Guide - Chromatic Cavern
Scrap Knight
The Scrap Knight fight is one of the busiest fights as there's a lot happening that you won't be used to. The Scrap Knight will employ a number of tactics to catch you off guard.
Coming out of the side of the stage you'll have spinning blades launched at you. From above blocks and soldiers will drop down, and when you try to attack the Scrap Knight he'll start jumping around. When Scrap Knight is jumping around you can either get lucky, and have him jump right next to you, or be unlucky, and he'll jump on top of you dealing damage. It's best to just wait out this phase and rush him when he's staying in one place.
As the fight continues the walls on either side of the arena will start slowly shutting down. This will limit the amount of space you can fight in. Be sure to focus on Scrap Knight so that you don't get in a situation where you're stuck. This can be especially bad if there are any explosives.
After defeating Scrap Knight he will become a playable character with the following stats
Treasure Knight Boss Guide
This is another boss fight that you start in a pile of blocks so be sure to chain yourself free asap for mobility. There isn't too much technically difficult about this fight, the Treasure Knight is able to hop around the stage like a number of the other bosses but the real pain from his will be in the range of his attacks. Treasure Knight will attack the 2x3 space of blocks in the direction he's facing. If you're constantly in a pattern of circling him you should be able to repeatedly get in attacks while also staying out of his line of time.
At certain times Treasure Knight will attack a 3x3 portion of the map and sink it. When this happens the squares will be blue and you'll need to walk over them twice to get through them, this will also repair the ground for future traversal.
After defeating Treasure Knight he will become a playable character

Tinker Knight Boss Guide
The Tinker Knight will begin his battle by throwing around tools in his vicinity. Unlike other attacks that telegraph where they're going to land the Tinker Knight's attacks don't have this added visibility. Aside from that and the normal dropping of items there really isn't anything more to this fight. The randomness in itself is enough to be something to worry about… until you get to the second phase of the fight.
Now in a large Mech, the Tinker Knight will take up the top three rows of the arena. Now the attacks you need to be looking out for are his 3 square wide punch that drops down from the top of the arena or the abundance of spinning blades. While he takes up the whole arena you need to hit the chassis area to actually deal damage to the Tinker Knight.
After defeating Tinker Knight he will become a playable character
Mole Knight Boss Guide
Mole Knight has a number of moves that you need to be watching from the very beginning of the battle. Like other Knights he will be able to jump around, be careful not to get squashed by him. After a few moments he will completely disappear from the stage, he's preparing to pop up underneath you so get moving. When the hazard marks show up you'll have a few beats still to get out of the way. When Mole Knight emerges the floor around him will be lava. Use the time while he's in lava to clear up some of the additional blocks on the screen.
One of the new monsters that will only appear in this fight is a 1 HP Volcano. This will randomly spit lava all over the battlefield. You should definitely try to take this out as soon as it appears.
After defeating Mole Knight he will become a playable character

Shovel Knight Pocket Dungeon Boss Guide - Flying Machine
Prism Knight Boss Guide
After a short cutscene, the battle will begin. The Prism Knight will respond every time it's hit by creating a duplicate of itself. You'll need to hit one of them to find out if it's real, sometimes the health bar stays under the real one so focus on hitting that. The duplicate will disappear in one hit, but if it isn't taken out it will mimic the attacks of the real Prism Knight. This can get out of hand pretty fast, especially if the duplicate is somewhere like the middle of the screen where it can get in the way.
Prism Knight's main attack is that she will create a shockwave that runs directly vertical and horizontal from her position. When approaching Prism Knight never do it directly, always stay one tile space adjacent.
Another attack of hers is a homing electrical strike. She'll start charging and a hazard area will appear around you. You'll learn as you begin moving that it will track you. You'll need to hit the Prism Knight to get her to stop charging this attack.
After defeating Prism Knight she will become a playable character
Propellor Knight Boss Guide
The Propellor Knight Fight has a number of things that you need to be keeping an eye out for. The Propellor Knight himself has a fast lunging attack, the beat after the warnings appear he will lunch so be ready. This attack is only one square wide so even if you do find yourself in the danger zone marked on the floor you can escape easily.
On the side of the stage, you'll see a fan that moves up and down pushing and pulling the player's character around. If you're in the high wind area you won't be able to move towards the fan, but will still spend a turn attempting it. The far left and right columns are pitfalls, if you get pushed or walk into these you'll take massive damage. NOTE: If you have the Nimbus Balloon Relic that allows you to "Hover Over Hazards" these pitfalls also count as hazards. This will effectively remove that complication from the level
Accompanying the fan is a cannon that will also appear and fire cannonballs across the stage horizontally.
The other big hazard of the battle is the bombs and slimes that drop. Unlike regular bombs, these have a two-square range and appear pre-activated. Steer clear of their range and you'll avoid damage, but you'll also have to be aware of the poison that the slimes leave. Be careful where you're stepping.
After defeating Propellor Knight he will become a playable character

Polar Knight Boss Guide
Battle starts with the two left and two right columns filled with blocks. This can limit your space to fight so best to start clearing some of them
Despite his size, the Polar Knight is a fast-paced fighter. His primary attack is a lunch. If Polar Knight lunges forward and connects with you he'll throw you away, if he connects with a block he'll do the same thing.
Once he starts losing some HP he'll start revealing spike traps under the floor. He'll also start using his second attack where he throws three snowballs in each cardinal direction. When he's getting ready ane d using the snowball attack use this time to clear up some mess around the stage
After defeating Polar Knight he becomes a playable character
Shovel Knight Pocket Dungeon Boss Guide - Scholar's Sanctum
Puzzle Knight Boss Guide
During this fight you'll see blue orbs dropping from the top, these are Puzzle Protectors and while they're around you won't be able to deal any damage to the Puzzle Knight. You'll know he's under the effect of a Puzzle Protector because he has a shield effect around him.
His main attack is a slice with his protractor that will hit all the squares in front of him. You can get behind him or to his side and still deal some damage though.
Routinely some monsters, including ones that drop lava, and health potions will appear. I recommend avoiding the lava monsters and just letting them collect at the bottom of the screen. You can then chain them all to drop their lava and then move away.
After he's taken a fair amount of damage Puzzle Knight will begin launching larger attacks. They're still easily telegraphed but taking the time to leave and re-enter this wide-range attack does give you fewer opportunities to deal damage.

Shovel Knight Pocket Dungeon Boss Guide - Secret Bosses
If you're trying to complete the Shovel Knight Pocket Dungeon True Ending then there are two secret bosses that you'll be able to face. If you want to learn more about those then check out our guide.
Have a tip, or want to point out something we missed? Leave a Comment or e-mail us at tips@techraptor.net

Andrew has written Video Game and Entertainment news, reviews, and guides for 10+ years. As Senior Content Manager, he assists in creating and editing… More about Andrew