Steel thy shovel fair adventurers! You've decided to check out Yacht Club Games' latest spin-off of the acclaimed retro platformer, Shovel Knight Dig. But this is a notable departure from other entries; this is a roguelike. Furthermore, it's a roguelike that doesn't reveal a lot of its complexity until you're a few hours in. Thankfully, we are here to help you plan your next excavation with this Shovel Knight Dig starter guide.

Shovel Knight Dig Starter Guide – The Basics of a Run
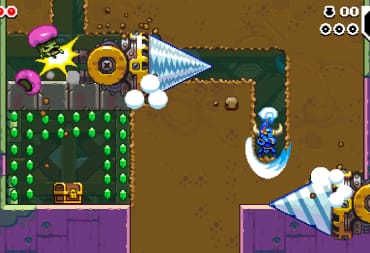
First, let's set the foundation for what makes up a run of Shovel Knight Dig. You navigate downwards through a series of randomly generated levels defeating enemies and collecting gems. There are hidden secrets and power-ups that will help you last longer. If you spend too long in a certain part of the level, a massive drill enemy will enter and attempt to kill you. Each major level ends with a boss battle. You keep going until you reach the bottom and face the final boss or you die. Every time you die, about a third of the treasure you collected is turned into flying money bags. The money bags will float randomly around levels in your next run until you collect them. The rest of your collected treasure is added to a personal bank on the surface. This personal bank is how you buy permanent upgrades between runs.
With that in mind, here are a few major tips to keep in mind as you play. First and foremost is try to collect all three golden cogs scattered throughout each level. Most of the time, these cogs require some skill, reflexes, or reaction times to get, but always make the effort. These cogs open up a small drill compartment at the end of each level and give you one of two options. The turkey on the left fully restores your health. The question mark on the right gives you a random power-up. Either of these greatly increases your odds of digging deeper and getting more treasure.
Second, there are a few symbols you should learn to parse. At the end of each level, you choose between two paths. Each of those paths have two symbols: the banner and the sign. The banner, so named because of the giant colorful banner in the background, simply shows what world you will go to when you descend. These typically change after a boss battle and can help you be more mindful about where you go. Second is the sign which usually shows the difficulty level as well as certain modifiers to be aware of. A series of dashes and arrows means there will be more of it; a X means it will not be present. Here is a rough list of those symbols:
|
Spinning Pinwheel |
This is the drill that shows up if you take too long during a run. Plan your next moves carefully. |
|
An Enemy Sketch |
This is self-explanatory. It simply means more of that monster will be in the next level. |
|
A Golden Horseshoe |
This means taking this path guarantees that a Relic Door will be at the end of the next level. If you've bought a Relic Key at the start of your run, this is your time to cash in. |
|
A Jet of Fire |
This is a level modifier where a column of fire will shoot up from the floor if you stay in one place for a few seconds. Keep moving. |
|
The Mole |
This guarantees a Mole character will appear in the next level, either as a food vendor or letting you spin a barrel to get a random power-up. |
|
An Apple |
There's a higher chance you'll find health pick-ups in the next level |
|
A Golden Star |
The level will be easier |
|
A Skull With Red Glowing Eyes |
The level will be harder |
Finally, there are vendors, keys, eggs, and relics. Vendors are exactly what they sound like. Find them, spend treasure, get upgrades. There are three major vendors to look out for. The first is the Mole, which will sell you various healing items. Some of these even increase your maximum health. Invest in the latter whenever you can. The second is Chester, the item salesman inside a blue treasure chest. He sells accessories, which can boost your speed or give you resistance to certain types of damage. Third is an ancient skeleton with a shovel blade. He will sell you powerful shovel attack upgrades. Please note that these upgrades are pricey, ranging about 850 gems at minimum, so plan accordingly.

Shovel Knight Dig Relics
Relics should be quite familiar to those who have played Shovel Knight before. A relic gives you an alternate form of attack or let you move in unexpected ways. They work a bit differently in Shovel Knight Dig however. You can only hold one at a time and have a very limited number of uses. Furthermore, magic upgrades are few and far between so you'll need to use these abilities conservatively early on. Here is a brief list of the Relics you can pick up at the start of the game:
- Flame Wand: You create a flaming sphere that bounces around the map, setting fire to enemies. You can knock this around with an attack
- War Horn: Blow this horn and it will severely damage all nearby enemies. It can also destroy loose dirt and cause floating treasure to drop to the ground
- Rising Dagger: Use this and you will slowly float upwards. Any enemy above you will get hurt.
- Throwing Trowel: A ricocheting projectile that can hit multiple enemies before disappearing. It can also remove a bit of loose dirt
- Reverse Exa: This is another projectile weapon that flies in a “U” shape, going downwards in an arc before shooting up. It can go through floors and walls.
Shovel Knight Dig Keys
Keys will show up at random as you play. If you find a key, simply get to a locked door or chest and the door will open. These unlocked rooms usually contain valuable items or bonus treasure. There are three different kinds of keys. While they can open any locked door, what kind of key you have will determine whether or not they break if you take damage while holding it. Those types of keys are:
- Glass: This key will instantly shatter if you get hit once
- Wooden: This key will instantly be destroyed if you're hit by fire, an explosion, or drills
- Metal: You will simply drop this key if you are hit. It can be picked up again.
Eggs operate in a similar fashion. If you find an egg, you need to find a nest hidden somewhere in the level. If you do, the egg will hatch into a companion that will help you fight until it runs out of health. The type of companion depends on what kind of nest you find. There appears to be no limit to how many companions you can have – personal record at time of writing is 3. Eggs will break if you take too much damage before getting to a nest.

Shovel Knight Dig Starter Guide – Permanent Upgrades
Finally, it is good to return to the surface after a run and invest long-term in Shovel Knight Dig. First, there is the shop you can find to the right of the entrance to the pit. Once you have at least 5000 gems in the bank, head there and talk to the shop keeper. Here is where you can purchase Relic Keys. Much like regular keys, a Relic Key sticks with you until it unlocks a Relic Door. They operate like metal keys; it is unbreakable but you will drop it if you are hit. Relic Keys are used to open Relic Doors, which lead to Relic Challenges. Clear a Relic Challenge and you'll add a new Relic to your drop pool. Once that is done, pick up an inventory upgrade. This will allow you to have one additional key or egg follow you when you pick it up. Now you have a free spot for whatever you pick up on your run.
Second there is the Blacksmith. When you first start Shovel Knight Dig, the Blacksmith will not be available. This is because he is somewhere inside the Smeltforge world; the world with the hammer and wrench as its banner. As soon as you can, get to that world and look for a blacksmith's hammer lodged somewhere in the wall. Strike it, then enter the hidden room and save the Blacksmith.
Once that is done, he will appear in the shop and provide armor upgrades. There's only one legitimately useful suit of armor at first: The Final Guard. Buy it immediately. You will take less damage from all sources and you can keep one power-up between runs. However, this is done at the cost of picking up less treasure. Finally, finding the Blacksmith will let you look for armor templates. These are tied to vague riddles given by the Blacksmith and will be covered in a separate guide.

Last but not least, there is the caravan to the left of the pit. This is where a new cast of characters will slowly enter as you get further into the game. Two of the biggest characters here however are Chester and Whisker. Speaking to Chester on the surface will allow you to add new accessories to the drop pool for future runs. Whisker on the other hand will provide you with a world skip feature. Once you reach a world the hard way, simply buy a pass from Whisker which starts around 2000 gems. Once this is done, simply buy a skip key from Whisker, which starts at around 400 gems, and you'll start your run in that world. Fair warning, skipping like this does mean you won't have to repeat early stages, but it also means you won't have as much health or helpful items.
With all of that in mind, you should have a good place to start in Shovel Knight Dig. We have only just scratched the surface with this game however, so if you want more involved guides, just dig a little deeper with us.
Have a tip, or want to point out something we missed? Leave a Comment or e-mail us at tips@techraptor.net

Ever since he was small, Tyler Chancey has had a deep, abiding love for video games and a tendency to think and overanalyze everything he enjoyed. This… More about Tyler