Our Retreat to Enen Walkthrough and Story Guide will tell you how to beat this tranquil, yet challenging survival game from start to finish.
Quicklinks: Getting Started With the Story | 1. Your First Day on Enen | 2. Enen Ruins 1
3. Your First Hunt | 4. Building a House | 5. Enen Ruins 2 | 6. New Sources of Light
7. Enen Ruins 3 | 8. Finally, Storage | 9. The Next Zone
Retreat to Enen Walkthrough and Story Guide - Getting Started with the Story
Before we get started with this Retreat to Enen Walkthrough and Story Guide, you'll need to make sure that you have a grasp of the game's basic mechanics. Check out our Starter Guide for that!
Retreat to Enen looks a lot like many other survival games on the market, but it is deceptively challenging. There are a lot of ways to lose, so play carefully and make sure to Save every day. Let's dive in to the Retreat to Enen Walkthrough and Story Guide!

1. Your First Day on Enen
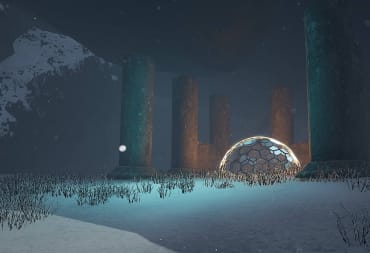
You'll arrive on Enen encased within a protective, dome-like portal. You're going to want to get moving immediately -- you have a lot to do!
First things first, you're going to want to walk straight ahead in this direction:

This path will lead you to a clearing that will serve as a good place to get started. Along the way, you'll want to collect any Rocks, Sticks, or Dead Plant Fiber you find.
You'll also want to progress the Tutorial by going through the menu options as prompted at the top-left of the screen. When you get to the prompt about water, do not progress any further -- you don't want to be drinking any Water just yet.
Continue to progress along this path and keep an eye on the right for a blue dome:

This is a Meditation Spot. These are critical for restoring your Spirit meter, and this will be the first one you visit after you progress the Tutorial a little more.
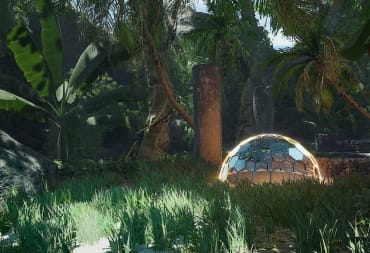
A few more steps on the straight path and you'll enter a very lovely clearing that is just perfect for serving as your initial basecamp:

Planning Your Base Camp
By now, you should have collected a fair few pieces of Wood and Rock. We're going to build the following items -- and again, do not drink Water yet, even though the game is prompting you to do so.
- Basic Shelter
- Fire Pit
- Cooking Pot
- 2 Raincatchers
You'll note that some of the items require things you haven't yet found: Clay and GemStone. Here's what they look like:

If you try to pick either of these items up (or you already have), you'll be prompted with a tutorial about Quantum Control. Quantum Control is a tool available by default, either by pressing R and selecting it from the Tool Wheel or pressing X to turn it on and off. You can tell if Quantum Control is active when there is a white atom symbol on the bottom-right of the screen.
Simply put, Quantum Control can be used to destroy objects. You can use it to bust up Clay, GemStone, and Coconuts, and it can even be used to dismantle your structures. Take care not to have it equipped when you're interacting with your Cooking Pot or other structures!
Either way, you likely won't have enough materials to build everything you need. You're going to have to search the area around base camp, but there's also a hazard to watch out for:

That is a Snake. Snakes typically remain stationary, but they will begin to uncoil as a warning if you get close. Get too close and it will bite you, poisoning you and giving you very little time to use an Antivenom (if you're even lucky enough to have one). Fail to use an Antivenom in time and your Health will deplete to zero, ending the game and forcing you to load your latest save.
Building the Basic Shelter and Saving Your Game
While we don't have enough materials to build everything, you should have enough items (or almost enough) to build the Basic Shelter. This will allow you to save the game, so let's do that now.
Here's what you'll need for the Basic Shelter:
- 2 Dead Plant Fiber
- 6 Wood
- 2 Stone
Once you have these items, press Tab to open up your menu. Select "Crafting," then select "Survival." Build the Basic Shelter in the clearing where we're setting up. Then, save your game.
Never Save in the Same Slot!
Things can go wrong pretty quickly in Retreat to Enen, so make sure you don't overwrite a critical save. Save in Slot 1 first, then save in Slot 2, then Slot 3, and so on. Only overwrite older save files once you're sure that you don't want to revert to an earlier save file!
Gathering Materials for Base Camp
You're going to need to gather up quite a few materials for your base camp. You're also going to want to keep an eye out for the following plants:

These are the Enen Flower and Teal Majesty. 2 Teal Majesty can make an Antiseptic in the Cooking Pot which cures you of the Pathogen or Malnutrition Affliction (debuff). 2 Enen Flower can be used to make Antivenom which cures you of the Poison Affliction.
2 of these plants will be enough to make these critical healing items. However, we want extras for the purposes of Farming -- while food is important, Antiseptic and Antivenom are absolutely essential life-saving tools. You'll want to eventually have one of each on hand at all times and, more importantly, you'll want the ability to easily make more of them whenever you need.
Finally, you're also going to want to keep an eye out for Food:

Don't eat any of this Food just yet -- hold onto them for now. We'll eat something later.
Here's what you'll want to collect in the area surrounding your base camp. Remember, walk slowly and avoid snakes -- if you get bitten by a Snake, you'll have to start the game over.
These are the building materials you'll need to collect to build your base camp (not including what's needed for the Basic Shelter):
- 7 Wood
- 10 Rock
- 24 Clay
- 4 Dead Plant Fiber
- 4 GemStone
The above list will be just enough to build a Fire Pit, Cooking Pot, and 2 Raincatchers. You'll also want to grab the following items while you're exploring:
- 4 Enen Flower
- 4 Teal Majesty
- Any and all Food you can find
Search for the construction materials until you have everything.
What do you do if you get lost?
Unfortunately, Retreat to Enen does not have an overhead map. This is by design. Unfortunately, it can also make finding your way home a challenge.
If you ever get lost, look for the house symbol. This will direct you toward the place where you spawned in.
Building Base Camp
Now that you have the materials in hand, let's go back to Base Camp and get building! First, press Tab to bring up your menu. Select "Crafting," then select "Survival.: You can build the Fire Pit, Raincatchers, and Cooking Pot from here.
Build the Fire Pit near the Basic Shelter you built earlier. Then, built the Cooking Pot on top. Build the 2 Raincatchers a short distance away.

Drinking Water, Eating Food, and Progressing the Tutorial
We've done a lot of work and we still haven't drank any Water. The reason for that is simple -- drinking any standing Water has the risk of inflicting the Pathogen debuff on you, and that debuff will eventually kill you if you don't have an Antiseptic on hand.
More importantly, you can catch the Pathogen debuff the very first time you drink Water, effectively dooming your first day to failure. Make sure to save your game at your Basic Shelter before you drink Water. You should also minimize drinking standing Water to reduce the chances of getting infected with the Pathogen debuff.
You should drink Water when your Water meter starts getting low (25% or less). Once it does, head to the camp and drink Water from one of the nearby pools.
If you've built Raincatchers and it's started raining, you're in luck -- it's much safer to drink Water from Raincatchers. Drink from there instead of one of the nearby pools.
After you've had some Water, you'll then be prompted to eat Food. Making something in the Cooking Pot doesn't count, so eat a Banana or an Enen Fruit from your inventory by bringing up the menu with Tab and selecting "Food." Highlight a piece of Food, and then press E to eat it.
Your First Meditation
Retreat to Enen is a game about meditation, and the next part of the Tutorial will prompt you to Meditate. Fortunately, there are several Meditation Points nearby.
Remember that one we passed on our way to the clearing where we built our base camp? We're going to go back there. Head back towards where you spawned in and look for the blue dome on your left as you're walking:

If you can't find it, any Meditation Spot will do; you'll only have to Meditate once on the first day. Once you find a Meditation Spot, walk up to it and press E to Meditate. You can participate in the on-screen breathing exercise if you feel so inclined. Otherwise, you'll want to continue to Meditate until your Spirit meter is full.
You can only use each Meditation Point once per day. If you need to do it again, you'll have to find another Meditation Point. Keep in mind, it's critical to keep your Spirit up -- low Spirit prevents you from running and renders you unable to use Quantum Control.
Almost Done with Day 1
The next step in the Tutorial is to "Ignite Fire," so go ahead and do that. Walk up to the Fire Pit and hold E to light the fire. The tutorial will then tell you to "Sleep when ready," but you can't go to sleep until nighttime. For now, we're going to focus on collecting more materials, food, and plants.
The most important thing to be on the lookout for is a total of 4 Enen Flower and 4 Teal Majesty. You want to do everything you can to have at least this many of these plants before you go to sleep -- it will make the following days much easier.
If your inventory gets full, it's a good idea to stand at a clearing near your base camp, open up your inventory, and drop items on the ground:

There are no storage chests available this early in the game, so you'll have to settle for throwing stuff in a pile on the ground for now. I recommend leaving Wood and Rock on the ground since they take up the most Weight.
Continue to collect materials until the clock in your inventory shows that it's nighttime. Then, return to base camp, save your game, and go to sleep.

2. Enen Ruins 1
Our second day will be focused on four key points:
- Finding the first Ruins on Enen
- Setting up the basics of Farming
- Cooking the essentials
- Collecting more materials
It's important to note that the House icon now indicates where you slept (that is, your base camp). No matter where you travel, you'll always be able to easily find your way home.
You may have noticed two hexagons on the screen, too. These are the portals to the Valley of the Giants and The Great North, respectively. We can't travel there until we discover all three of the Ruins on Enen, though, so we'll worry about those later.
Before we go anywhere, it's a good idea to drink Water and fill your Thirst meter. You should also eat some Food to get your Hunger and Health above half at the minimum. Do not eat any Potatoes or Mushrooms -- we'll want to save those for more complex Cooking later.
If you haven't already, make sure to drop any Rocks or Sticks you have on the ground. You'll likely be carrying a bunch of stuff back and you'll want as much Weight capacity as you can manage.
Our next step will be to head into the foliage behind our camp. First, walk into the trees behind your camp:

As always, make sure to keep an eye out for Snakes! Stay at least 5 feet / 2 meters away so you don't get bitten.
You'll eventually hit a cliff wall. Turn to your left and you'll see an opening in the cliff face:

Walk straight through this opening.
As you walk through, you'll see a Meditation Point on the right:

Keep the location of this Meditation Point in mind in case you need to use it later. You now know the location of at least two nearby Meditation Points, which should be more than enough for any one day.
Keep walking straight:

As you move forward, you'll notice a faint golden glow on the trees.
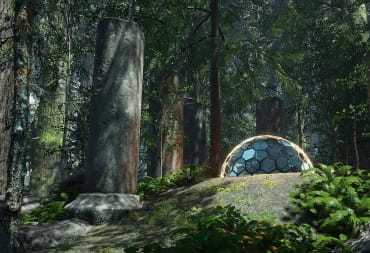
Continue moving forward and you'll encounter your first Ruins on Enen:

Ruins feature a special gold-colored Meditation Point that is a little different from the standard Meditation Point in several key ways:
- Ruins restore your Spirit Meter much faster than a standard Meditation Point.
- You have to listen to a narrated meditation exercise instead of the breathing wheel.
- You're forced to sit through a portion of the meditation exercise.
- Once completed, the Ruins will unlock new Crafting and Building items.
- Once completed, the Meditation Point on the Ruins disappears forever.
Your main objective is to find three Ruins in each zone, starting with the island of Enen. One down, eight to go!
Now, you might think it's a good idea to try to rush and find all of the Ruins. It's not, and here's why: you'll likely run out of Food or come down with some kind of Affliction that will cause you to fall ill and become Medically Evacuated, causing you to lose the game.
With that in mind, our next step is to return to base by following the House icon. On the way back, you'll want to grab any Rocks, Sticks, Clay, or GemStone that you can carry along with any Food or Plants you can find.
Now that we're back at base, it's time to start Cooking. Start things off by adding some Wood to your Fire Pit. Stand near the Cooking Pot and interact with it. We'll use 2 Teal Majesty to make an Antiseptic. It takes time for it to Cook, so we'll do other things while that's happening.
Your next step will be to Craft 2 Tonic Bottles which cost 2 GemStone and 1 Dead Plant Fiber each. These will be used to store an Antiseptic and Antivenom, respectively. These are essential survival items that you should carry on you at all times.
Keep an eye on the progress of the Antiseptic while you're working on other things. Once it's done, you'll want to bottle it by pressing Q instead of E. Then, Cook an Antivenom for 2 Enen Flower. Bottle that once it's done, too.
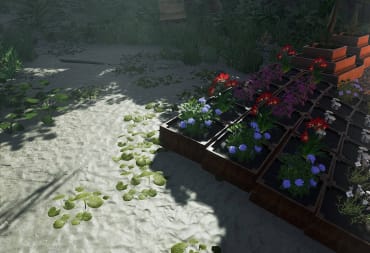
Let's also get some Farming going while the Antiseptic and/or Antivenom is Cooking. It's important to note that Farming will not produce additional Crops. Rather, they will give you easy access to these Crops after 3 days. Plants and other Food respawn on a regular basis -- all Farming really does is save you the trouble of looking around for these items or carrying them around all the time.
Our first step is to make a Water Canister in Crafting > Survival; it will cost 1 GemStone, 2 Dead Plant Fiber, and 2 Clay. This will allow you to pour Water on your Crops.
Next, we're going to build 8 Planters near our base camp. These will be used for the following:
- 2 Teal Majesty
- 2 Enen Flower
- 2 Potato
- 2 Mushroom
Teal Majesties and Enen Flowers are used for making Antiseptic and Antivenom, respectively, so we want to ensure that we have a supply of those. Potatoes and Mushrooms are used in many Cooking recipes, so we want to have an adequate supply of those on hand, too.

Your Farming operation will expand as time goes on, but that's enough for today. You can opt to plant more Potatoes and Mushrooms if you'd like, but hold onto at least 2 of each for Cooking.
I would also recommend Crafting a Water Flask. This adds a bottle to your toolbar that can be used to store Water from Raincatchers, allowing you to fill your Thirst meter on the go a total of four times. Unfortunately, you can only fill the Water Flask in Raincatchers.
Our final major steps for the day will be to hit a Meditation Point when necessary and to Cook a more complex food. Food made in the Cooking Pot can have several beneficial effects and can provide a better boost than the component parts. I recommend making either a Breakfast Scramble or a Mushroom Soup.
You'll likely have some time remaining in the day, so explore the area near the Ruins you just visited to collect Food, Wood, Stone, GemStone, and Clay. We'll be expanding the base camp tomorrow with some new items, so it's a good idea to get as much stuff as you can now.
Ignite your campfire and go to sleep when you're ready.

3. Your First Hunt
We now have some crops growing, some Antivenom, and some Antiseptic. It's a little safer to explore, and we're going to use this newfound freedom to explore an alternative food source: Hunting.
Hunting is not just useful for the Meat you'll get from the animals -- you'll also get Pelts which can be used for Crafting some very useful items. Before we can go, though, we'll need to be properly equipped.
First, collect the following items:
- 33 Wood
- 26 Dead Plant Fiber
- 11 Stone
- 10 Clay
- 8 GemStone
- 2 or more Feathers
Feathers can be found in certain clearings and bird nests.
Next, open up your Crafting menu and go to Hunting. We'll be making the following items:
- 1 Spear
- 1 Bow
- at least 2 Arrows
Next, we're going to build a Smoker. A Smoker makes Meat stay fresh longer -- Smoked Meat is a good way to store food for the long term. I recommend placing it next to your Fire Pit for now.
Finally, we're going to be building 4 Pelt Drying Racks on the other side of the river. Drying a Pelt will take around a day, so you want them somewhere nearby that is also not in the way of your everyday movement.
After you've Crafted and Built all of these items, you're ready to go Hunting.
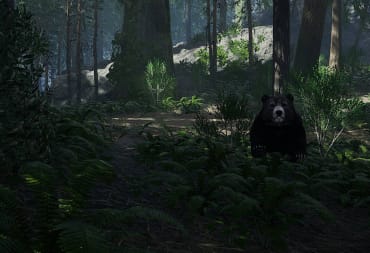
There are a fair few animals you can Hunt: Turkeys, Iguanas, Turtles, Rabbits, Boar, and Snakes. Yes, you can finally kill the annoying Snakes that have been bothering you. That said, our main target is going to be Boars.
Boars provide 2 Pelts and 4 pieces of Large Meat. 3 pieces of Smoked Large Meat will be enough to totally fill your Hunger bar from 0, so you can think of each Boar as one more day that you don't have to worry about Food. Critically, the Pelts can be used to Craft some useful items, too.
If you come across a Snake, it's best to leave it alone. If you do decide to kill it, I strongly recommend using the Bow -- getting into melee range with the Spear is far too risky.

You can, of course, opt to hunt smaller creatures -- you'll still get something useful. Our main goal here, however, is to have at least 6 Pelts in total, however you get them. We'll also want to keep an eye out for at least 2 more Enen Flower and 2 more Teal Majesty.
Spend the day Hunting and return to camp when you're satisfied that you've got what you want. Load up the Pelt Drying Racks first. Then, go over to the Smoker and get that going; remember, it needs Wood just like the Fire Pit.

Once the Pelt Drying Racks and Smoker are loaded up, go over to the Cooking Pot and make a second Antivenom and second Antiseptic. We will soon be traveling greater distances and it's a good idea to have 2 of each on hand, just in case. Don't forget, you'll need Tonic Bottles to store them!
Smoke as much of your Meat as you can and collect more materials as needed. Then, ignite your Fire Pit and go to sleep -- tomorrow, we'll get to work on a proper home.

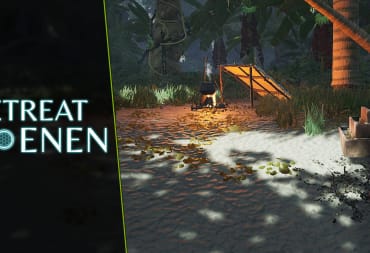
4. Building a House
The next major goal is to Build a proper house. We won't need anything especially large, but this will take several days.
Strictly speaking, Building a house is not necessary. However, it will allow you to safely store excess items without worrying about them sailing off into the distance if they bounce the wrong way, whether you're dropping them on the floor or leaving them in Baskets.
There's one distinct advantage to Building a House and sleeping in a Hammock, and it all has to do with this screen:

This screen means that a Spider has bitten you in the night and poisoned you. This can happen in any zone when you're sleeping in a Basic Shelter, even if you have a nearby Campfire. This doesn't happen when sleeping in a Hammock.
I recommend that you build a 2 x 4 arrangement of Square Foundations and surround it with Stone Walls. I also put some half walls inside to create a cordoned-off area for storing loose items.
Here's what my house looks like:

Inside, I have a Hammock, 2 Smokers, a Fire Pit (for light), and a Furnace. A Furnace effectively serves as a Fire Pit indoors, allowing you to Cook Meat on it and providing warmth and light. Unfortunately, it can't fit a Cooking Pot.
I also have several baskets storing my Food and a larger storage area for loose Wood, Clay, Stone, and GemStones. On the outside, I have two Fire Pits with two Cooking Pots so that I can Cook two things at the same time.
You may be tempted to build a massive house. I recommend against doing this, at least with the Wood and Stone structures. The Building system is very finicky and making anything larger than a house that's 2 blocks wide would effectively require a second floor; check out our Building Guide for more details.
However you want to build, you should expect it to take at least 2-3 days between gathering materials and construction. Naturally, you'll also have to take care of all of your other needs, too, so keep that in mind.
The Crops you planted will grow in 3 days. Once picked, they'll start growing again and will once again be available in 3 days.. Remember -- you should always have 2 Antiseptic and 2 Antivenom on hand at all times, just in case.

5. Enen Ruins 2
You've tackled Farming, Hunting, and Building. I can safely say that you are well and truly set up to survive now. You could stay here for months, but that's not the point of this Retreat to Enen Walkthrough -- it's time to get moving on our actual goal and seek out the second Ruins on the Island of Enen.
First, head towards this opening in the clearing:

You've likely gone down this path many times and it is probably familiar to you by now. While you may not have a good idea of what the whole island looks like, you'll likely have a solid mental image of the area immediately around your camp.
Continue going straight and you'll pass over a horizontal tree:

If you look very carefully, you'll see the slightest hint of tan in the distance. That's the beach -- we're going to go to the ocean.
Keep moving forward and you'll eventually hit the beach:

On the left, you'll see a massive rock with some brush cascading down the side. On the right is a small, standalone island. For now, we're going to go into the water and ignore the island on the right.
Swim out and make a left turn past the rock. As you turn, you'll see another beach in the distance:

See that area I've circled? That's where we'll be making landfall. Keep swimming toward it.
This is what it will look like when you land:

Keep heading straight ahead on the beach and keep your eyes on the left.
You'll eventually come across a Meditation Point right on the edge of the beach:

Don't worry about using the Meditation Point right now; we're very close to the Ruins and you'll be able to refill your Spirit there.
Continue moving slightly forward and you'll encounter this clearing:

We're almost there! Make a right turn.
Then, make another right turn and you'll see the familiar golden glow in the distance:

And we've arrived! Meditate at these Ruins and we'll unlock some new goodies which we'll address in the next section.
There is, of course, the matter of making your way back home. Fortunately, you have a very handy symbol on your HUD that shows you exactly where home is. Make your way back, taking care to collect any useful resources or Hunt any animals you'd like on the way back.

6. New Sources of Light
Unlocking the second Ruins on Enen gives you a few interesting new Crafting opportunities, two of which are reliables sources of light.
Firstly, we have the Solar Garden Lamp. This is exactly like the tiny garden lamps that people use on their front lawn to illuminate the path. Unfortunately, it requires Obsidian, a resource we won't be able to get until we open up the next zone.
The second new source of light is the Head Lamp, and this is something that we're able to Craft now. We can also make Crab Pots and Fish Nets.
A note on the Fish Nets -- I've built some and I've placed them, but I can't seem to figure out how to make them work. I have seen fish, but I have yet to manage to catch anything despite my best efforts. Feel free to build some and experiment, but I've reached the conclusion that they are not necessary to survive.
In any case, we'll be going to the second zone soon -- Valley of Giants. It's best to start preparing for it now.
We're going to want to focus collect the following:
- 12 Oyster Shells
- At least 7 Cured Pelt
- At least 11 GemStone
- Raw Meat
- Wood
- Dead Plant Fiber
Let's get to it!

Collecting Oysters and More Hunting
You may have stumbled upon Oysters while scouring the beach. If not, you can see what they look like in the above image.
You should spend a day focused on collecting Oysters (and the other items you need in the above list). Drop any excess materials you don't need to maximize your storage space.
One final note before you leave -- bring 1 Cured Pelt with you if you have it. If you do, you'll be able to immediately craft the Head Lamp. If not, don't worry about it -- you can Craft it later.
Oysters can be collected and there are two ways to eat them. You can either drop them and open them with Quantum Control like a Coconut or you can cook them on a Fire Pit or Furnace.
As anyone who enjoys seafood knows, eating raw Oysters can lead to sickness and Retreat to Enen is no different. That's why I recommend collecting the full dozen Oysters first and properly Cooking them. If you eat the raw meat, you might get an Affliction and you'll be forced to use an Antiseptic. Either way, you'll get an Oyster Shell once you actually eat the meat (whether Cooked or not).
While we're out searching for Oysters, it's also a good time to do some Hunting. Cured Pelts are necessary for some critical gear that you'll be using in the third zone (The Frozen North), but Cured Pelts are also used for decoration objects. If you want to make a really nice house, you'll want a good supply of Cured Pelts.

Crafting the Head Lamp
You can craft a Head Lamp once you have some Oyster Shells. Here's what you need in total:
- 2 Oyster Shell
- 1 Cured Pelt
- 1 GemStone
The Head Lamp is a piece of equipment like the Spear or Bow. It never runs out of power (as far as I know) and it can be turned on or off at will. You've spent a couple of nights in the darkness by now, so you will probably understand the value of an artificial source of light.
I strongly, strongly recommend that you craft a Head Lamp. It will make your life so much easier, especially when you find yourself far away from home in the darkness.

Crafting Crab Pots
We also now have access to Crab Pots, a new way to get Food. You don't need them, but it can't hurt to have an additional food source.
Here's what you'll need for each Crab Pot:
- 1 Rotten Meat
- 4 Dead Plant Fiber
- 10 Wood
If you've been judicious about smoking your Meat, you won't know how to get Rotten Meat. Here's how: simply leave Raw Meat in your inventory. It will eventually turn into Rotten Meat. You'll need a piece of Rotten Meat for the initial construction and you'll need an additional piece for every subsequent time you wish to bait the Crab Pot.
Raw Crab Meat is only used in a handful of recipes. It's better to use your Smoker to preserve most of your Raw Meat for the long-term, so don't lean too heavily into catching Crabs. It's not worth it.
Crab Pots have to be placed underwater. Head to your nearest beach and put some down if you'd like.
Ultimately, the key points for today are to collect Oyster Shells, Cured Pelts, and Smoked Meat. Store your collected goods away and get ready to go on the move again -- we're heading out to the third and final Ruins on Enen.

7. Enen Ruins 3
We've got some good infrastructure going and a fair amount of preparation done. We're ready to move onto the third and final gate on the island of Enen!
First, look around your base camp and find this hexagon icon as shown here. Start walking towards it down this path:

It's going to take you a small amount of time to reach this point; you'll be running for at least a full minute. You'll have to make some slight turns here and there.
Keep the hexagon icon in front of you and continue moving along what feels like the natural path. You'll eventually reach this location:

This is not the Ruins you're looking for. Rather, it's the gate to The Great North, the third and final zone we'll cover in this Retreat to Enen Walkthrough. We can't go in it just yet; for now, it will serve as a useful waypoint to the third Ruins on Enen.
While facing The Great North gate from this position, turn left and you'll see a Meditation Point on the left and a path to the beach:

Head down to the beach, turn right, and keep following the beach. Once again, you'll have to run for about a minute or so.
After around a minute, you'll come across a Meditation Point on the beach as shown here:

This is our next waypoint.
Run up to the Meditation Point and then look beyond it from this perspective:

Note that there is an uphill path in the distance where the arrow indicates.
Walk towards it. Depending on your graphical settings, you might not see the grass that is there until you'll get closer. Soon, you'll approach this point:

Keep walking straight ahead.
Eventually, you'll see that familiar golden glow of Ruins. We're here!

Meditate at the Ruins as usual. As usual, you'll have unlocked some new items to play with, but we'll worry about those when we get back home.
To get back home, you can either follow the home icon or retrace your steps for your original journey. Either way, make sure to collect anything you might need and watch out for Snakes!

8. Finally, Storage
Meditating at the third Enen Ruins has unlocked some neat items like a Bed and a Fireplace. Those all pale in comparison to something you probably wished was available from the start: storage.
The Storage Container can be found in the Crafting > Luxury menu. Here's what it costs to make one:
- 6 GemStone
- 2 Dead Plant Fiber
- 8 Wood
Each Storage Container has a capacity of 25 Weight. That means it can hold 25 Wood (at 1 Weight each), 12 Stone (at 2 Weight each, with one extra space left over), and so on.

If you're like me, you probably have a pile of junk all over your house or on the ground. Now would be a good time to make some Storage Containers and stow away your resources.
There's one especially important reason to build Storage Containers now -- we're about to enter a new zone. We'll be getting access to new resources that will require you to build more plots for Farming and give you access to more Buildings. It's a good idea to have a way to stockpile resources for future exploration.

9. The Next Zone
We've unlocked all three Ruins on Enen. It's time to move on to the next zone: Valley of Giants.
You can read about the next area in our Retreat to Enen Valley of Giants Walkthrough Guide. Make sure to check out our other guides below, too!
Have a tip, or want to point out something we missed? Leave a Comment or e-mail us at tips@techraptor.net
One of my earliest memories is playing Super Mario Bros. on the Nintendo Entertainment System. I've had a controller in my hand since I was 4 and I… More about Robert N