Just when you thought there couldn't be more to keep an eye out for as you're making your way through The Medium, Memory Shards are introduced to you. The Memory Shards allow you to listen to a conversation that took place in a location, further deepening your understanding of the narrative that Bloober Team has spun.
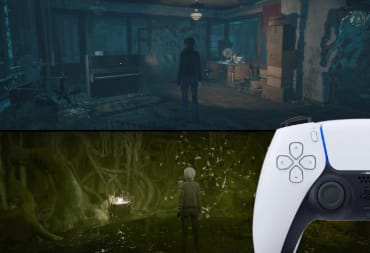
You will only ever encounter these Memory Shards during periods of time where your vision is split and you can see both the human world and the world of the spirits. In the real world, you might see a normal-looking object, but in the spirit world, it will look like white energy has exploded outwards. By interacting with the object you need to move your control stick/mouse to reform the image, normally into that of one or multiple humans. Once you've gotten the match correct you'll then get to enjoy a brief bit of dialogue. Throughout your journey there are 10 Memory Shards to collect, most you will encounter along the way or are even story related, but every now and then one is hiding away.
What do I get for collecting all of The Medium Memory Shards?
Yet again these collectibles have an achievement for running into one of them, and there is also a bonus for collecting every Memory Shard in a single playthrough. The achievements are as follows:
- I Know the Pieces Fit - Reconstructed a Memory Shard
- Puzzling Out The Past - You Reconstructed all memory Shards In A Single Playthrough
Where can I locate all of The Medium Memory Shards?
The Medium Memory Shard #1

After dropping down the hole that we warned you not to drop down in Echo #3 you’ll be in a new hotel room. On the left side of the room, you’ll see a book next to some pots. You’ll recognize when you’re near a Memory Shard by the distortion on the Spirit World view.
After interacting with the book you’ll need to move your mouse/control stick to reform the memory. For obtaining your first Memory Shard you’ll earn the I Know the Pieces Fit achievement.
Memory Shard #2
In the room with the dead flower, you’ll see Memory Shard #2. Chances are you’ll have already noticed it your first time moving through this area as an out of body experience. Once you return here with the real-world version of Marianne you can collect this Memory Shard.
Memory Shard #3

After entering the Dayroom head directly forward and around the left-hand side of the table. Just past the table is an IV Drip that you can interact with for this memory shard.
Memory Shard #4
After completing the puzzle in the room to the left of the Daytime room you’ll be able to walk out onto the balcony and into a room with a piano. Interact with this shard by approaching the table in the back of the room.
Memory Shard #5

After picking up the key in the room with the previous shard open up the skin in your path and make your way across to the back right corner of the Dayroom (where you got the item for the globe puzzle) and unlock the door. Once inside interact with the glasses on the table in the back left of the room (It will be the rightmost interact point)
Memory Shard 6 - 8 are all part of the story and will not appear unless you've completed the one beforehand. Because they are all story based that also means that these ones are impossible to miss.
Memory Shard #6
After completing the Dayroom and heading downstairs head to the right of the room. There will be a small series of steps up to a canvas. This area is right next to where you found the Mentor’s Diary page.
Memory Shard #7

After collecting Shard #6 you’ll see a spirit trail that will lead you to this Shard. It is a Red Doll that’s sitting on a table just across from the stairs you walked down to get to this room.
Memory Shard #8
This is the final shard in this chain of required story Shards. After inspecting the Red Doll that was Shard #7 another spirit trail will lead you to the left of the room behind the stairs. Here you’ll find a red bow that is the eighth Shard.
Memory Shard #9

After making your way out the back of the shed if you make your way around to the left side of the Red House there is a new Shard for you to collect. It is a gas can lying against some planks and dirt.
Memory Shard #10
Directly in front of the Red House is the Shard you’re looking for. This one would be very difficult to miss. After you've collected this final Memory Shard you'll get your achievement pop for Puzzling Out The Past.
Have a tip, or want to point out something we missed? Leave a Comment or e-mail us at tips@techraptor.net
Andrew has written Video Game and Entertainment news, reviews, and guides for 10+ years. As Senior Content Manager, he assists in creating and editing… More about Andrew