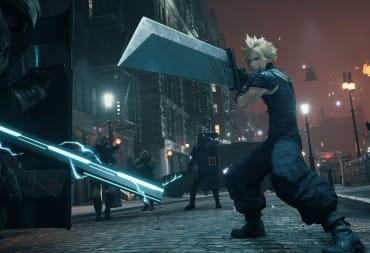
The complete Episode Intermission DLC for Final Fantasy VII Remake will take you somewhere between 3-4 hours (unless you've gotten lost playing too much Fort Condor.) Your little taste of adventuring as Yuffie caps off as you descend into the Weapons Research Facility of the Shinra Building in Sector 0. Here you'll face an enemy that only originally showed up in the spin-off/sequel to Final Fantasy VII when he appeared in Dirge of Cerberus. This Nero Boss Fight will challenge players by introducing a number of elements that aim to always keep pressure on the player and through this multi-stage boss fight, you'll need to know what to expect if you want to get through it easily and to the final cutscenes of the DLC.
FFVIIR Nero Boss Fight - Pre-Fight Strategy
Before we get into the nitty-gritty of the boss fight we're going to take a look at what you can do to prepare yourself. There are the obvious things to take care of like making sure your weapons are as upgraded as they can be, and making sure your characters have solid material equipt.
Due to a boss mechanic that will start slowly bleeding you of your health, I really recommend attaching anything you can to speed up the ATB gauge for both Yuffie and Sonon. Completing that box challenge earlier in the chapter is super helpful as this grants you a number of those kinds of Materia. You'll be using these ATB gauges to juggle between Sonon auto-healing when critical, and using Yuffie as a ranged healer during the third phase of the battle. I'd also highly recommend equipping Yuffies third available weapon, because of its Banishment skill that will build up as you do more ATB-related special attacks. You want to always make sure that Yuffies ATB bar never completely fills, when it reaches two complete bars either heal yourself/Sonon, or use an ATB attack to be constantly charging your weapons ability.

FFVIIR Nero Boss Fight - Phase 1
The first phase of the Nero boss fight is by far the most standard. He's a pretty scary-looking dude but will alternate between close-ranged attacks with his wings, to flying above you and striking from a distance. The kind of fighting that has gotten you so far in the game will make do for the first stage of Nero. The trigger to move onto the next stage of combat is once he receives a certain amount of damage so it's definitely worth hanging back a bit to continue charging up your Banishment.
Keep an eye out for his Binding Talons, here Nero will dash towards you and get you in a hold. If you get stuck there for the duration of the move he'll do damage at the end, but if you get Sonon to deal enough damage you can break free.
Once he's passed this stage there's a short cutscene where he throws Yuffie through a one-way mirror and removes his hands from their straps.
FFVIIR Nero Boss Fight - Phase 2
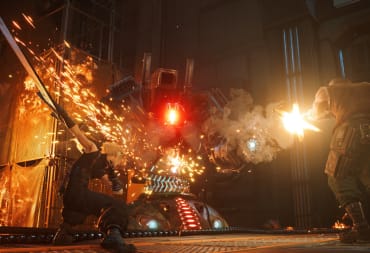
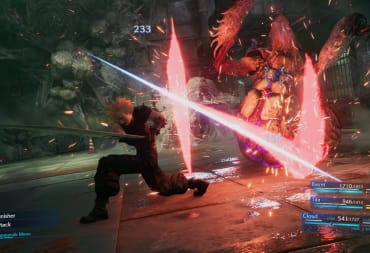
In stage two of the fight Nero has a number of things to watch out for. The first thing is that Nero will immediately Haste himself, use this chance to get a few hits in or better yet hatse/cure yourself. You'll still see his normal attacks like slashing out with his wings but they'll now be cloaked in darkness giving them a bit of extra range so be sure you're giving yourself enough time to get out of there. Nero will also fly up and shoot a wave of darkness and tentacles at you, if this attack connects with you you'll start being drained of your health. It's going to be your priority for the rest of the battle to avoid any of the darkness attacks that he'll be sending your way.
This is a great time to start unleashing your weapon abilities that you've been storing up. Keep an eye out for any time you're able to start pressuring Nero and go in for some quick high damage attacks to bring up his stagger meter.
A big attack you'll want to look out for is the Chaotic Pulsars, here a number of tentacles will erupt from the floor and after a few moments explode even further. You'll take damage on initial touch, and if you're stuck in them will take some serious damage. This also leaves you open for a short time for Nero to follow up with another strong attack. During the times you see Chaotic Pulsars appear over Nero's head find a place free from tentacles and use this time to send off your shuriken and heal up a bit.

FFVIIR Nero Boss Fight - Phase 3
Just when you thought it was hard enough to stay out of the life-draining darkness.... at the start of Phase 3 Nero will summon it all around the arena. If you stay in the middle of the stage chances are you won't have to touch it but whether you back into it, get knocked back into it, or pursue a fallen Nero into it there's a chance you'll get caught in it one way or another. Nero will begin to get more in your face too using his Spatial Shift to move in close and immediately slam down with his wings. The best way to avoid this combo is by quickly moving to the side.
Pretty much all of Nero's darkness-based attacks will also get an upgrade here, beams will be wider, landmine tentacles will explode larger. For every attack you were already conscious of avoiding give yourself a further 5-10 feet distance.
FFVIIR Nero Boss FIght - Phase 4
Nero's final form isn't too different from his previous three but he gains a new ability. You know all of those darkness attacks you've been focusing really hard on to ensure you don't have all of your health drained away? Now Nero can cover the entire battleground, there's no way to avoid this so the pressure is really on. It's almost worth spending a bit of time making Phase 3 last a bit longer just so you can take the time to fit some extra heals and ATB charging time in. You'll want this phase to go by the fastest, I prepared for that as previously stated, as well as by leaving any Limits I have charged up, and Banishment abilities. I wanted to make sure that I was reducing his health just as quickly as I was taking down his.
In this form, his wings will also become a target, but he's already at low enough health that you'll likely just want to focus on him and not spend any more time on the fight as you race a clock.
This arena-wide absorption doesn't last the whole rest of Phase 4, but Nero is able to re-summon it whenever he wants... so keep an eye out for that. It's just another reason why you want to finish off this form faster than the rest, so you can avoid suffering through that multiple times.
After that though you've now completed Episode Intermission and are ready to watch the conclusion of Yuffie's story so far. After the credits, you're also treated to a special cutscene showing the party from the main game as they leave Midgar, as well as a short cutscene with a special guest.
Have a tip, or want to point out something we missed? Leave a Comment or e-mail us at tips@techraptor.net

Andrew has written Video Game and Entertainment news, reviews, and guides for 10+ years. As Senior Content Manager, he assists in creating and editing… More about Andrew