Our Farthest Frontier guides will help you learn how to play this Colony Sim and build your own thriving Settlement in the wilderness!
Quicklinks: Farthest Frontier Guides | Farthest Frontier Starter Guide | F.A.Q.
Farthest Frontier Guides
- Building and Tech Tree Guide
- Desirability Guide
- Farming Guide
- Diseases Guide
- How to Kill a Wolf
- How to Kill a Bear

Farthest Frontier Starter Guide
Farthest Frontier can be a bit challenging as far as colony sims go. Our Farthest Frontier Starter Guide will help you learn the basics of the game and set you up for tackling some of the more difficult scenarios.
Starting a New Settlement
Naturally, your first step is to start a new settlement. You could just pick a name and hit "Start," but this is a really bad idea for your very first game.
First, let's break down the various parts of starting a new game:

Selecting Your Difficulty
There are three general options for selecting your difficulty:
- Pioneer - The easiest difficulty setting.
- Trailblazer - The equivalent of normal difficulty.
- Vanquisher - The hardest difficulty setting.
I recommend that you select "Trailblazer" for your first time playing the game. It will be a challenge, yes, but it will be far from insurmountable.
Advanced Settings
In addition to the basic settings, there's also a lovely button called "Advanced Settings" that will allow you to fine-tune several aspects of the game.
We're not going to mess with the Advanced Settings for your first playthrough, but here's what they do just in case you're curious:
- Map Seed - This is the code used to generate your map. It can be used to share maps with other players. If you've got a map seed from someone else, this is where you would input it. You can also see your Map Seed on the menu while in a game.
- Extra Resources - Determines how many Villagers, how much food, and what equipment you'll start out with.
- Pioneer
- 12 Villagers
- 16 Months of Food
- 5 Weapons
- 4 Bows
- 150 Arrows
- 30 Tools
- Trailblazer
- 12 Villagers
- 9 Months of Food
- 5 Weapons
- 3 Bows
- 100 Arrows
- 20 Tools
- Vanquisher
- 10 VIllagers
- 4 Months of Food
- 4 Weapons
- 3 Bows
- 80 Arrows
- 15 Tools
- Pioneer
- Maladies - Determines how likely Disease will spread amongst Villagers.
- Pioneer - -60% chance for Disease to spread.
- Trailblazer - -30% chance for Disease to spread.
- Vanquisher - No reduction in chance of Disease spreading.
- Wildlife - Determines spawn rate of Animals and hostile Wildlife like Wolves and Bears.
- Pioneer
- Deer - Plentiful
- Boar - Rare
- Wolves - Rare
- Bear - Extremely Rare
- Trailblazer
- Deer - Average
- Boar - Average
- Wolves - Average
- Bear - Rare
- Vanquisher
- Deer - Rare
- Boar - Plentiful
- Wolves - Plentiful
- Bear - Average
- Pioneer
- Raiders - Affects how often Raiders and hostile armies attack.
- Pioneer
- "Raiders will occasionally invade your settlement, wreak havoc, and steal goods."
- Trailblazer
- "Raiders will occasionally invade your settlement, wreak havoc, and steal goods."
- "The invading Armies of local Lords may demand a payment for settling on their lands, lest your settlement be razed."
- Vanquisher
- "Organized groups of elite raiders have been seen in the area, and have been known to attack with reckless abandon, seeking glory on the battlefield."
- "The local Lords in the area are particularly brutal, and do not take kindly to those that would squat on their lands. Do not expect your presence to go unnoticed."
- Pioneer
Terrain
"Terrain" selects your map type. There are five different options:
- Arid Highlands - "Dry, desolate highlands with infertile soil, sparse pine barrens, and wasteland[,] but rich in mineral deposits. Hard environment difficulty."
- Alpine Valleys - "Northern mountain valleys, thick with conifer forests and interspersed with lakes and occasional meadows. Medium environmental difficulty."
- Lowland Lakes - "An idyllic setting of dense forests, lush meadows[,] and lakes teaming with fish. Easy environmental difficulty."
- Plains - "Expansive plainland with fertile meadows, dry grassland[,] and brush[,] but few forests and lower mineral resources. Medium environmental difficulty."
- Random - "Generates a random map that can vary significantly between mountains and flat land, lakes or dry land, and various mixes of biomes. Variable environmental difficulty."
This is where we're going to deviate from the default: select Lowland Lakes for your map. It will be a much easier experience that will help you get acclimated to the game.
I strongly recommend that you don't select any of the other map types until you have a few hours in the game and a good understanding of its mechanics. The additional challenge will make it much tougher to succeed!
Settlement Name
This is what your Settlement will be called. You can push the dice button to select from randomized options or you can input a custom name.
Map Size
You can choose between a Small, Medium, and Large map. Medium is the default, so we'll go with that for now.
Pacifist Mode?
Turning on "Pacifist Mode" will disable Raiders, invading armies, Wolves, and Bears. Do not turn this option on for your first playthrough.
Starting the Game
Now that we've covered the settings, it's time to start the game! Remember, this is what you should have picked:
- Trailblazer Difficulty
- Lowland Lakes Map
- Medium Map Size
- Pacifist Mode Off
Name your Settlement and click "Start." You'll get a loading screen and we'll be in the game after a short while.

Placing Your Town Center (or Rerolling the Map)
Once you're in the game, you'll be presented with a large area of the map revealed and a prompt to place your Town Center.
Be very careful in selecting where you place your Town Center. While you can easily move most Buildings in the game, your Town Center is stuck wherever you place it. Furthermore, it serves as a defensive Building where your Villagers can garrison within and shoot arrows at invaders -- you'll want to ensure it's in an important location, too.
I recommend placing your Town Center on relatively flat land and 20 or so blocks away from water. You'll also want to check the fertility of land by pressing "F" -- this will show you a good spot to build Farms.
You can place your Town Center anywhere within the circle of the scouted area. If it's not to your liking, you can go into the options menu and "Reroll" the map, generating a new map of the same type but with a different seed. Don't hesitate to reroll the map if you don't like what you see -- you're going to be playing here for a good few hours at least!
Understanding the Farthest Frontier UI
You'll need to know how the UI works in order to succeed in this game, so take a gander at this image.

Here's a description of each of these items:
- Report for Last 12 Months - Provides graphs and other information showing how your Settlement did over the last 12 months including Food Production, Goods & Material Production, and Villager Stats.
- Sick Villager Counter - Shows you how many Villagers are ill (if any).
- Population Counter - How many Villagers you currently have vs. how many you have enough Housing for.
- Villager Happiness - Shows you how Happy your Villagers are overall.
- Food Stores - Shows you how many months of Food you have stored away. The second number in parenthesis shows you have many months worth of food will spoil within the next year.
- Calendar - Shows you the month and the season. Each block is a month, and the images behind the blocks represent the seasons.
- Resources - A tracker for your various resources. From left to right:
- Wood - Acquired from Trees.
- Firewood - Made at a Firewood Splitter.
- Planks - Made at a Saw Pit.
- Stone - Gathered from large stones in the world.
- Clay - Gathered from Clay Pits.
- Bricks - Produced at the Tier 3 building Brickyard.
- Gold - Produced through Taxes or Trade.
- Auto Upgrade and Settings Buttons
- Auto Upgrade - When turned on, Buildings will automatically be flagged to upgrade to the next Tier. On by default.
- Settings - Your mouse-driven access to the Settings menu.
Planning Your Settlement with the "Crossroads" System
Now that your Town Center is placed, we'll have to figure out how we're actually going to lay out the town.
If you're like me, you may be occasionally stuck with "Blank Canvas" syndrome. You don't really know what should go where when confronted with an abundance of open space.
That's why I've developed the "Crossroads" system of Building a Settlement. It's a simple way of determining what goes where:

In this image, you can see a road splits the Settlement into four Quarters.
- The top left is the "Commercial" Quarter. This is where Storage and non-polluting workshops like the Cobbler and Basket Shop go.
- The top right is the "Residential" Quarter. This is where Houses go and where you'll put some key Buildings that improve Desirability such as the School and Healer's House.
- The bottom right is the "Agricultural" Quarter. This is where your Farms and Orchards go.
- Finally, the bottom left is the "Industrial" Quarter. This is where we'll place all of the Buildings that negatively impact Desirability such as the Firewood Splitter, Tanner, Compost Yard, etc. This is the same quadrant that holds the Town Center and will ensure there's enough distance between these Buildings and your Houses, preventing any loss in Desirability.
The Commercial, Agricultural, and Industrial Quarters in this plan are fairly straightforward -- simply place the Buildings however you think it would make sense.
The Residential Quarter, however, will need a little more planning:

Our goal for this Farthest Frontier Starter Guide will be to get you up to Tier 2 with the ability to expand further. To make that happen, the Residential Quarter will be laid out with nine grids made with roads.
The central space is best used for key Buildings that will improve Desirability of most (if not all) of the surrounding Houses:
- Market
- Healer's House
- School
- Shrine
- Parks, Gardens, etc.
Additionally, each of the squares in the cardinal directions (north, south, east, and west) have a little extra space between the houses. This will give you more room for Decorations which can improve Desirability.
Here's a more specific layout:

This system can definitely be used to take you to Tier 2 and even Tier 3. Advancing to Tier 4 -- which doesn't have any Buildings as of Early Access Version 0.1.4 -- will likely require a change in layout or a different strategy which this guide will not cover.
Why all the complexity with laying out Housing? It's simple: High Desirability will allow you to upgrade your Houses. Upgraded Houses are required for advancing to higher Tiers and they also pay taxes which can offset any Guards, Soldiers, or Services you have that cost money to run every month (such as the Compost Yard).
The Crossroads system of planning will serve as the framework for this guide. Now that we got that covered, let's move on to actually Building things out!
Clearing Land for your Town Center and Building the Crossroads
Trees and Rocks will be automatically flagged for removal once you pick your location for the Town Center. It will take a short time for the Villagers to actually do that. While they're working, take a look at the immediate area around town.
You can clear additional land by pressing "H" and dragging the box over Trees and Rocks you'd like to flag for removal. Your Villagers will get to them eventually. You can, if you wish, increase or decrease the number of workers and Prioritize jobs by clicking on the individual Tree or Rock.
While they're working, press "N" to bring up the interface for Building a Dirt Road. Drag out a Crossroads with your Town Hall on one of the corners. Remember, the Town Hall will be the quarter where your "polluting" Buildings will go.

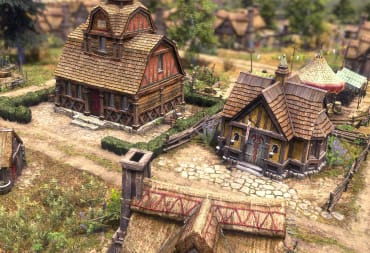
Building Houses, a Well, and a Firewood Splitter
Our next step will be to Build the first grid square for the Residential Quarter.
Use a road to make a 6x6 Square in the quadrant opposite your Town Center:

Place three Shelters in the corners. Build a Well in the farthest corner as shown in the image above.
You'll need Stone for the Well; if you don't have any, designate a nearby Rock for removal to get it by pressing H and dragging a box over it or by selecting the Rock individually and selecting "Harvest Resource." You'll also likely need more Wood soon, so designate some trees in the immediate area for harvesting.
At the same time, we'll want to place a Firewood Splitter:

Put the Firewood Splitter next to the Town Hall. Make sure it doesn't negatively impact the Desirability of your first Shelters. One of your Villagers will automatically take on the job of making Firewood as soon as the Building is completed.
You may also have to move your Storage Cart out of the way. You can do this by selecting the Storage Cart and clicking the "Move Building" button on the top left of its interface.
Fishing Shacks and Forager Shacks
We now have a source of Water, enough Housing for everyone, and Firewood in production. Our next step is to secure an early-game source of food.
Extend the road facing the water to the shoreline. Then, build two Fishing Shacks and two Forager Shacks:

As with the Firewood Splitter, Villagers will immediately occupy these jobs. This time, however, we'll have to do some setup.
For the Forager Shack, you'll have to designate an area where the Villager will gather various wild Herbs, Plants, and the like:

You can designate the area the Villager will work by clicking on the Fishing Shack and then clicking on the golden ring on the top left of the Building's menu. Make sure to designate different areas for each of the Forager Shacks.
Take note, some of the berry bushes can be moved closer to your town. Click on the bush and take a look on the top right -- if you see a button that allows you to move it, you can bring it closer to your Forager Shacks.
Similarly, the Fishing Shacks will need to be set up:

Once again, click the golden ring to designate an area. This time, you'll want to target areas along the shoreline to get as many of the blue bobbers within the ring as possible.
As with the Forager Shacks, don't allow the rings to overlap. These four Buildings will help bring in some extra Food for the coming months. Now, we need somewhere to put it.
Building Storage and Clearing Land
The Storage Cart we started with doesn't have very much capacity, so we're going to want to get some proper storage set up.
First, we're going to start Building a Stockyard. This will be used for storing raw materials and other non-food items used for Building. We'll put it in the corner in-between the Residential Quarter and the Industrial Quarter as shown here:

Once that's done, you'll have access to the Storehouse and Root Cellar, and we'll be Building those shortly.
For the moment, we're going to need to get more Wood and some more Stone, too. Start by designating the area around the Residential Quarter for harvest:

As for Stone, you'll probably have to look around the area and individually tag some rocks. Do that.
You'll likely be entering Winter at this time, but there's still a lot of work ahead.
Building the Saw Pit and Side Roads
Our next step will be to build a Saw Pit. This Building allows you to produce Planks which are needed for more advanced structures.
We'll also want to build some side roads as shown here:

As an aside, you'll likely have finished your Root Cellar and Storehouse by now. Once they are, click on your Storage Cart and uncheck all of the items on the bottom. This will ensure that your storage Buildings are the only place that future goods will be placed.
After the Saw Pit is completed, click on it and disable one of the slots -- we only want one person working on it for now.
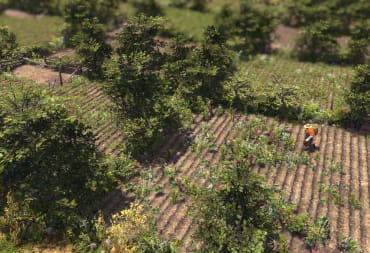
Building a Farm and a Graveyard
By now, you should be roughly halfway into your second year. We have just enough Food for everyone to survive. Now, we're going to set about expanding our Food production to prepare for more people.
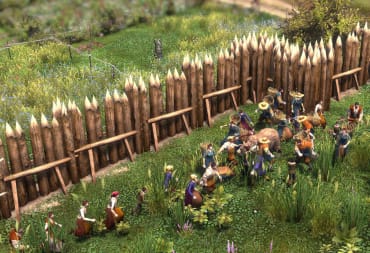
Start Building a 5x5 Farm in the Agricultural Quarter, one square away from the roads:

That one space will be for fencing, if needed -- if you have Deer nearby, they will eat your crops if you don't have any kind of barrier protecting it.
Prioritize the construction of the Farm and ensure that there are 5 Villagers working on it. Ideally, we want to finish it before Winter; you can't work on Farms during the Winter. If we can't, we'll pick things up next Spring.
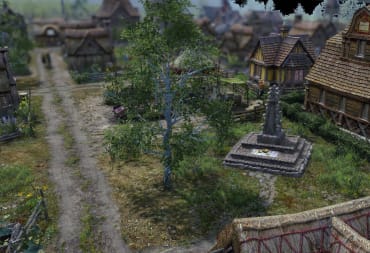
This is also a good time to build a Graveyard a ways down the road:

Graveyards are necessary for preventing Disease if one of your Villagers die. You don't want to just leave them out on the ground like some kind of savage.
Once the Farm is done, you'll want to set up its Crop Rotation like this:

You can learn more about Farming in our Farming Guide, but for now, this will do. This will plant Turnips at the start of the year, followed by Clover to restore some Fertility to the Soil, and then another round of Turnips.
This gives you a good addition to your Food supply -- a necessary move as we'll be expanding soon.
Setting up a Compost Yard
While your Farm is under construction, you should build a Compost Yard.
Make sure to build it in the Industrial quarter where it won't impact the Desirability of any Houses:

The Compost Yard will collect waste (Read: poop) from your Houses and store it in a centralized location.
This will help prevent Disease, and it will also gradually build up Compost that can be used as Fertilizer. (The main concern at the moment, though, is getting the poop out of your homes.)
Expanding the Settlement
After the Farm and Compost Yard are built, it will be time to get a fresh influx of new Villagers.
We're going to expand the Residential Quarter like this:

The central space is 6x8 blocks and the rightmost space is 6x6 blocks, just like the first little square we've built.
Next, we'll add four more Houses like this:

Note the open space in the middle. This can be used for Decoration later; don't worry about it for now.
The addition of these new houses, combined with your added Food production, will attract Immigrants, and we badly need them:

Take a look at the Professions Screen. We have:
- 2 Laborer
- 1 Firewood Splitter
- 1 Sawyer
- 1 Nightsoil Collector
- 1 Farmer
- 2 Fisherman
- 2 Forager
You may notice that Laborer is in red. Laborers will Build structures, chop down Trees, and move goods around town; 2 Laborers are far too few for a Settlement of any size.
We need more Laborers before we can add more Buildings, hence the need to expand the Residential Quarter and add more Houses.
Building a Second Farm
As more Villagers move in, we'll want to Build a second Farm.
This second Farm will have a similar setup to our first Farm, with one notable exception -- we're going to stagger the production of Turnips:

Generally, I like to have two fields per Crop. The third and fourth Farms should be another Crop, the fifth and sixth Farms should be another different Crop, and so on.
The addition of a second Farm will help keep your Villagers fed, but our nutritional needs are still razor thin. We'll be adding another way to collect Food soon, but first we have to do a few more changes to the layout.
Expanding the Residential Quarter and Building a Market
The addition of new Villagers means a fresh supply of Labor. It's time to put some of those bodies to work.
Our next goal will be to expand the Residential Quarter like so:

This will give us the layout for future Housing additions. Each square should have four Houses. The wider Squares should have an open space in the middle for additional Decoration as needed. This will come into play when we're going to upgrade our town to Tier 3 later.
From here on out, you should add more Houses as needed. Don't add any just yet, though -- we're going to expand our Food production with a new addition: Hunting.
Setting up Hunting and Smoking Meat
Our next addition will be a pair of Hunter Cabins. First, though, we'll have to find animals to Hunt.
Pause the game and select two Villagers by making a box around them:

Highlighting Villagers in this fashion will allow you to assume direct control. Now we're going to pretend that we're playing a traditional RTS and start scouting the area around the Settlement.
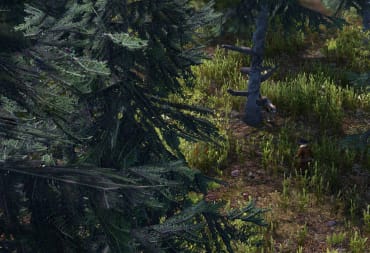
Ultimately, we're looking for either Deer or Boar, represented by the green symbols shown below. You may also find a Wolf Den (represented by the red circle) -- this is something to be avoided for now, so give them a wide berth.

Traveling in pairs will give you a little more safety if you encounter a Wolf or Bear along the way. We could use more Villagers, but two will be enough for now. Too many and you'll risk slowing down work at the Settlement.
Continue to explore the area until you find either Deer or Boar. Then, build a small section of Dirt Road, putting a Hunter Cabin on either side. Finally, connect the Dirt Road back to your town:

As usual, select the golden circles and make sure that they cover the area where Deer or Boar are spawning. If you're fortunate enough to find more than one spawn, assign one spawn to each Hunter Cabin.
Next, we'll build a Smokehouse in town:

The Smokehouse will smoke Meat, preserving it and allowing it to last longer.
One Smokehouse will be more than enough for two Fishing Shacks and two Hunter Cabins, so we won't need to worry about adding more for some time.
Add Two More Farms
Even with the Hunter Cabins, we still run the risk of coming up short on Food.
It's time to build another two Farms and make use of some of that extra labor we have. This time, we'll be growing Peas -- here's how to set up the Crop Rotation:

We can't squeeze in two crops of Peas every year like we can with Turnips.
However, they grow so quickly that we can grow a round of Clover and do some field maintenance every year, ensuring a steady supply of food every year.
Tannery, Cobbler, Fletcher, and Basket Shop
While the Farms are being built, we're going to expand the production of goods by adding four new Buildings: a Tannery, a Cobbler, a Fletcher, and a Basket Shop.
The Tannery, as you might expect, can severely reduce Desirability, so make sure to put it in the Industrial Quarter far away from your Houses:

The Cobbler, Fletcher, and Basket Shop, on the other hand, will have no negative impact on your Houses.
That means that these three Buildings can be placed in the Commercial Quarter:

Here's what each of these new Buildings do:
- Tannery - turns Pelts (from Hunting) into Hide Coats, keeping your Villagers warm in cold weather.
- Cobbler - turns Pelts into Shoes, preventing your Villagers from walking around barefoot and catching Tetanus or Worms.
- Fletcher - turns Logs into Bows and Arrows, supplying your Hunters and Villagers with basic ranged weapons.
- Basket Shop - Turns Willow into Baskets, which allow your Villagers to carry more and making them more efficient at their work.
Each and everyone one of these buildings will make your Villagers' lives better in meaningful ways. They're also the last additions we can make before jumping into Tier 2.
Add Four More Houses
By now, your Food production should be pretty great -- at this point, it's Autumn of Year 5 and I have 16 months of Food stored up, 5 months of which will spoil in the next 12 months.
We can safely increase our population some, so let's add 4 more Houses (which will increase our population by a maximum of 16).
Unlocking Tier 2
Our little Settlement is coming along nicely. We can now finally progress to Tier 2 and unlock some new Buildings!
Here's what we need to get to Tier 2:
- 8 Shelters
- 1 Market
- 30 Population
- 40 Planks
- 25 Stone
You should already have all of those things (or you'll have them soon enough). When you do, you'll see a big icon above your Town Center:

Click on your Town Center and push the big "Upgrade" button.
It will take some time for your Villagers to do the upgrade. Once they're done, you'll have unlocked Tier 2 Buildings!
Building a Trading Post
With Tier 2 unlocked, we have two more additions to make.
The first is the Trading Post -- I strongly recommend you Build it near your storage in the Commercial Quarter. As the name implies, the Trading Post can be used for Trading. It's a good source of Gold, and you can trade Gold for items you may need.
Here's what the Trading interface looks like:

Each Trader will either buy, sell, or buy and sell an item. There will also be a long list of items that the Trader is neither interested in buying or selling.
Before you can Trade, you'll have to transfer items or Gold to the Trading Post; these items will be inaccessible by your Villagers while they're in the Trading Post.
Once Your Trading is done, you'll have to move items from the Trading Post to Global Storage in order to actually use them.
The Soap Shop
We have one more Building to erect in this Farthest Frontier Starter Guide: the Soap Shop. The Soap Shop converts Tallow (from Hunting) and Herbs (from Foraging) into Soap:

Soap prevents a number of Diseases. It's important to produce enough Soap for your Villagers or Disease will spread throughout your Settlement.
Be proactive and always make sure you have enough Soap production going!
Dealing with Raiders
By now, you'll have 30-40 Villagers, ample food, and production of many essential goods. Your Root Cellar may even be full! (Build a second Root Cellar to store even more goods if need be.)
Success, however, also comes with perils -- you'll likely start encountering Raiders. Here's how to combat them:
- When Raiders are spotted, immediately pause the game.
- Click on your Town Center and click the "Garrison Villagers" button.
- Unpause the game and watch your Villagers mow down Raiders.
As time goes on, you'll want to Build Fences or Walls to protect your town and towers to go with those. For now, though, simply sounding the alarm should be enough to minimize the damage from raids.
Tier 2 and Beyond
That's the end of our Farthest Frontier Starter Guide, but you still have a lot of work ahead of you!
Going forward, you should prioritize the following:
- Building a Healer's House in the center of your Residential Quarter
- Building a School in the center of your Residential Quarter
- Adding more Farms as needed
- Expanding your population as needed
- Increasing Desirability, which allows Shelters to Upgrade into Homesteads and increasing your tax income
There's still a lot more to figure out with this game, but you have a good understanding of the basics by now. Good luck!

Farthest Frontier F.A.Q.
What is Farthest Frontier?
Farthest Frontier is a colony sim where you Build a medieval village from scratch and fend off Raiders and hostile Armies alike.
Is Farthest Frontier Multiplayer?
No, Farthest Frontier is not multiplayer.
Have a tip, or want to point out something we missed? Leave a Comment or e-mail us at tips@techraptor.net
One of my earliest memories is playing Super Mario Bros. on the Nintendo Entertainment System. I've had a controller in my hand since I was 4 and I… More about Robert N